

A natural hair regimen is simply a repeatable schedule: you cleanse, condition, moisturize, seal, and protect on a fixed rhythm, then adjust it as your hair responds.
Chances are you don't need more products. You need to know which few to use, in what order, and how often. That's what we'll give you in this article, starting with the schedule itself.
What kind of products do you need?
What products do you already have in your bathroom cabinets?
It's common for ladies that have recently decided to go natural to get overwhelmed by the sheer amount of hair-related information on the internet.
Free 50-page guide
Your hair is already growing. The problem is keeping it.
About a third of an inch a month on textured hair, not the half inch you’ve read. If your length looks stuck, that’s your hair breaking off as fast as it grows in. Here are the seven causes of breakage and the weekly routine that stops them.
Free. One email a week after that. Unsubscribe anytime.
There are seemingly countless products, tools, methods, and techniques for nearly everything hair-related, from everyday moisturizing to deep conditioning. If you're new, it may feel like the options are almost endless.
In order to be successful, especially as a newbie, we recommend that you start with a natural hair regimen that's as simple and flexible as possible. It's also important that your regimen is adaptable based on the ever-changing needs of your hair.
There are many factors that impact the needs of your hair on any given day, such as the temperature outside, humidity, hard water, the hair products you use, and much more.
Even if your hair feels thoroughly hydrated and moisturized this week, it might become lifeless and extremely dry the next week. You'll need to be willing and able to adapt to the unique needs of your hair.
Ideally, the best natural hair regimens involve products that work together in addressing two of the most important hair needs: protein and moisture.
Any hair regimen that doesn't consider protein and moisture might fail to work well in the long run.
Your Starter Regimen: What to Do and How Often
Here's the short answer, before we get into the details: run a wash day once a week, deep condition every time you wash, add a protein treatment about once a month, moisturize and seal between washes, and cover your hair at night. That's the entire regimen, and everything after this section is about adjusting it to your own hair.
Here's the schedule we'd hand a beginner on day one. Treat it as a starting point, not a prescription.
A starting schedule for a beginner regimen. You'll adjust every line to your own hair; the sections below explain how.
| Step | How often | What it does | Adjust it if… |
|---|---|---|---|
| Pre-poo | Before each wash (optional) | Coats the strands with oil so the shampoo strips less of the hair's own moisture. | It leaves your hair limp or weighed down. |
| Cleanse | Weekly, or every 2 weeks | Removes sebum, sweat, dead skin and product from the scalp and strands. | Your scalp gets oily, itchy or flaky sooner — wash more often, not less. |
| Clarify | Monthly, or when buildup shows | Strips stubborn residue, silicone and mineral deposits a regular shampoo leaves behind. | Your hair is very dry — stretch to every 6–8 weeks. |
| Protein treatment | About monthly | Reinforces strands that have gone limp, over-stretchy or gummy. | Your hair feels stiff or snaps rather than stretches. That is a moisture problem, and protein will make it worse. |
| Deep condition | Every wash day, 15–20 min | Restores softness and slip after cleansing. | Never skip it after a protein treatment. |
| Leave-in, then seal | Every wash day, on damp hair | Adds a water-based moisture layer, then locks the water in with oil or butter. | — |
| Moisturize and reseal | Every 1–3 days between washes | Replaces the water your hair has lost since the last wash. | Your hair still feels soft — stretch the interval rather than adding product. |
| Protect at night | Every night | Cuts the friction and moisture loss that happen while you sleep. | — |
This is a starting point, not a prescription. Frequency is the part most people get wrong, and the right frequency for you depends on your porosity, your density, and how much you handle your hair, not on your curl pattern.
Wash day is what most of us call the whole cleanse-condition-style block, whether yours runs 45 minutes or most of a Sunday.
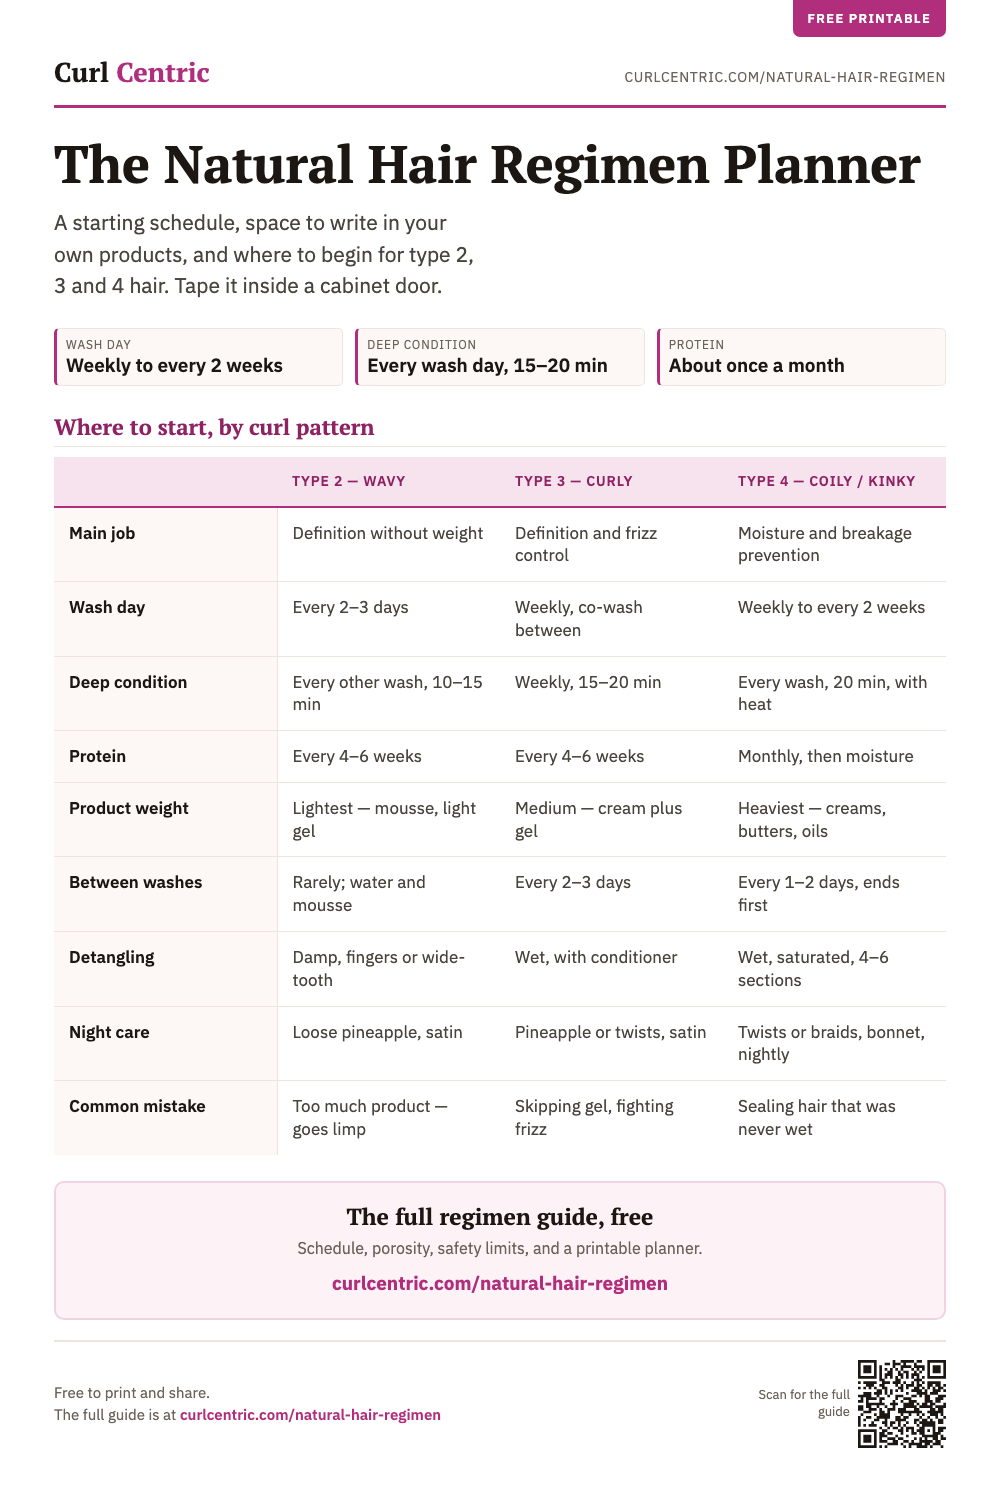 2 pages
Free printable
The Natural Hair Regimen Planner
Everything on this page, on one sheet you can tape inside a cabinet door, with space to write in the products you already own.
Two things decide how far you'll move off this schedule: how porous your hair is, and how much you handle it. Porosity comes first.
Start With Porosity, Not Curl Type
Most regimen advice sorts people by curl pattern: 3B, 4C, and so on. Your curl pattern tells you how your hair looks and roughly how much it shrinks. But it doesn't tell you what to put on it.
Porosity does. It's how readily your hair takes on water and lets it go again, and it's governed by how tightly the cuticle scales lie against the shaft. That one property decides whether a product absorbs or sits on top, whether heavy butters soften your hair or suffocate it, and how long your hair takes to dry. Two people with identical 4C coils can need opposite products, simply because one has low porosity and the other has high.
Porosity, which is how readily your hair takes on water and lets it go, decides what to put on it. Your curl pattern doesn't.
| Porosity | What you notice | What tends to work | What tends to backfire |
|---|---|---|---|
| Low | Water beads on the surface. Hair takes a long time to get properly wet and a long time to dry. Products sit on top, and can flake or pill. | Lightweight liquids, milks and gels. Gentle warmth during deep conditioning to help absorption. Apply to damp hair rather than soaking hair. | Heavy butters and thick creams, which sit on the surface and build up. Frequent protein. |
| Medium | Absorbs water at a moderate pace, holds a style, and is generally cooperative. | Most balanced products. The starter schedule above, with little modification. | Treating a problem you do not have. This is the porosity that gets over-managed. |
| High | Soaks up water almost immediately and dries fast. Often feels rough or frizzy, and tangles easily. Common on color-treated, heat-damaged or simply older ends. | Thicker creams and butters. Layering — liquid, then cream, then oil. Regular protein. An acidic conditioner or final rinse. | Skipping the sealing step. Avoiding protein, which this porosity usually needs. |
The float test isn't reliable. Dropping a strand in a glass of water gives results that shift with strand thickness, product residue, and how recently you washed, so it can sort you into the wrong column with total confidence. What you notice across a few wash days is better evidence.
You've probably seen the float test, where you drop a shed strand in a glass of water to see whether it sinks. It isn't reliable. The result shifts with strand diameter, product residue, and whether you've just washed, so it can sort you into the wrong category with complete confidence. What you notice over a few wash days is better evidence than the glass: how fast your hair wets, how long it takes to dry, and whether your products absorb or flake.
Porosity isn't fixed, either. Heat, color, and chemical processing raise it permanently on the length they touch, so your ends and your new growth can genuinely want different things. If the two halves of your hair never seem to agree, that's usually why.
If you want the longer version, we've got full guides to hair porosity and high porosity hair, plus how to moisturize low porosity hair.
Starting Points by Curl Pattern
Porosity tells you what to put on your hair. Your curl pattern tells you how much, how often, and how gently. Because the tighter the curl, the harder it is for your scalp's own oil to travel down the strand, and the more points that strand has where it can catch, bend, and snap.
And that last part is measurable rather than folklore. When researchers examined more than 2,000 hairs from African volunteers under light and scanning electron microscopy, they found knots along the shaft in 10 to 16 percent of strands, against 0.15 percent in the comparison groups, with many shafts showing evidence of repeated breakage. That's not damage; it's how tightly coiled hair is built. And it's the reason coils need gentler handling than waves do, which is what the table below is built on.
Where to start, by curl pattern. Find your column, then adjust it for your porosity.
| Type 2 — wavy | Type 3 — curly | Type 4 — coily / kinky | |
|---|---|---|---|
| Main job | Definition without weight | Definition and frizz control | Moisture retention and breakage prevention |
| Wash day | Every 2–3 days | Weekly, co-wash between if needed | Weekly to every 2 weeks |
| Deep condition | Every other wash, 10–15 min | Weekly, 15–20 min | Every wash, about 20 min, with heat |
| Protein | Tolerates it well — every 4–6 weeks | Every 4–6 weeks | Monthly, always followed by a moisturizing deep conditioner |
| Product weight | Lightest — mousse, light gel, thin milks | Medium — cream plus a gel over it | Heaviest — thick creams, butters, sealing oils |
| Between washes | Rarely; refresh with water and a little mousse | Re-moisturize every 2–3 days | Re-moisturize every 1–2 days, ends first |
| Detangling | Damp, fingers or wide-tooth comb | Wet, saturated with conditioner | Wet, fully saturated, in 4–6 sections, fingers first |
| Night care | Loose pineapple on a satin pillowcase | Pineapple or loose twists, satin | Twists or braids under a satin bonnet, every night |
| Most common mistake | Too much product — it goes limp and stringy | Skipping gel, then fighting frizz all week | Sealing hair that was never properly wet in the first place |
Curl pattern sets the starting point. Porosity decides where you go from there. A type 4 with low porosity and a type 4 with high porosity run the same schedule with very different products, so read this table alongside the porosity table above rather than instead of it. Density and strand thickness change the amounts, not the steps.
Find your row, then adjust it for your porosity. Your curl pattern sets the starting point; porosity decides whether you'll move heavier or lighter from there. A type 4 with low porosity and a type 4 with high porosity run the same schedule with very different products.
Density, Shrinkage, and the Layering Methods
Density is how many strands you have per square inch, not how thick each strand is. It changes the amounts, not the steps. High density means more sections, more product, and a longer drying time. Low density means less product and lighter formulas, because heavy creams flatten sparse hair quickly. Here's the rough check: with your hair dry and unparted, how easily can you see your scalp? Easily is low, barely is high.
Strand thickness is a separate question: how wide a single hair is. Fine strands get weighed down by the very products coarse strands need. And you can have fine strands at high density or coarse strands at low density, so those two combinations want opposite things.
Shrinkage is how much shorter your hair looks than it measures when stretched. Loose waves may lose very little, while tightly coiled hair can appear less than half its true length. It's a sign of healthy elasticity rather than damage, and it’s worth naming; “my hair isn’t growing” is very often shrinkage and not a retention problem at all. Our free hair calculators will do the arithmetic for you.
Layering order. Two shorthand methods come up constantly and they're worth knowing by name: the LOC method, which is liquid, then oil, then cream, and LCO, which swaps the last two. Higher-porosity and tightly coiled hair often does better with LOC, because the cream on the outside holds everything in. Finer or lower-porosity hair often prefers LCO, or neither. Neither one is correct in the abstract, so pick one, run it for a month, and judge it on how your hair feels on day three.
Detangling is where most of your breakage actually happens, so it earns one rule that holds no matter what your curl pattern is: detangle wet, with enough conditioner to give you real slip, working from your ends up toward your roots, in sections, fingers first, and a wide-tooth comb second. Never dry, and never from the roots down.
You're the Real Natural Hair Guru
We've written extensively on why we believe that you are the true natural hair guru. However, here is the short version: There are very few things about hair care that are definitive gospel; only a few techniques will work for everyone across the board.
Just because a certain technique or product works for 90% of people doesn't mean that it will work for you. You can very well be in the 10% of those who can't use a particular technique for whatever reason.
Even advice based on comprehensive scientific research might not work every single time.
Many people (including Kira and me) like to offer haircare advice and tips based on their experience (or other people's experience), but it's important to consider the advice as an opportunity for you to experiment with your natural hair regimen.
The key to developing a great natural hair regimen is knowing your hair and finding its tolerance. Keep in mind that you're the expert on your hair. No one can possibly know your hair better than you do.
Now let's look at some of the most important factors that you'll need to consider when choosing products for your natural hair regimen.
There are two main product categories to have in mind: moisture-based products and protein-based products.
The rule of thumb here is the more you do to your hair chemically, the more of both moisture and protein you'll need.
The sections below will briefly outline the basic components of products for a healthy hair regimen based on the aforementioned categories.
For each category, we have included a list of product suggestions, though the lists are not exhaustive. There are just too many products to include on the list.
Don't forget that building a good hair care regimen also means having to experiment with several products before finding the ones that suit you best.
What You'll Need to Build a Basic Healthy Hair Care Routine
1. Shampoo
Moisturizing shampoo: Use this product once or twice a week based on your schedule. The best moisturizing shampoos typically don't have ammonium or sodium lauryl sulfates and will not leave your hair feeling tangled, stripped, or squeaky clean. Instead, they are just gentle cleansers that leave your hair feeling detangled and soft.
Clarifying shampoo: Swimmers and people who have hard water in their houses should utilize chelating shampoos. Use the product once a month or twice if you use hair grease and other heavy oils on your hair quite often.
A clarifying shampoo will strip your hair of the product build-up and is a great way to start your hair off every month.
After clarifying, your hair should and will feel squeaky clean. A chelating shampoo, on the other hand, works on a deeper level to remove any stubborn mineral deposits on the hair.
Don't forget that every head of hair is unique. Based on your situation, you might need more than one shampoo in your routine.
If you don't have hard water and you only use a small selection of hair products, you might only need a moisturizing shampoo to complete your natural hair regimen.
If you use a lot of oils and styling gels, you will need to consider using a clarifying shampoo every once in a while to occasionally remove this product build-up.
2. Moisturizing Deep Conditioner
A good hair care routine should include a great moisturizing conditioner. Moisturizing conditioners generally follow the moisturizing shampoo after every wash.
Deep condition on every wash day for 15 to 20 minutes. Use heat from a hooded dryer if you've got one, and skip it if you don't. If you wash twice a week, only one of those washes needs it. And if you want the frequencies for every other step, they're in the starter schedule near the top of this article.
Once you've determined how to build your natural hair regimen, we recommend reading our deep conditioning article. It's advanced, but it will teach you how to produce amazing results.
It's easy to get confused on the conditioning front, as not all moisturizing conditioners are created equal. There are a number of moisturizing formulas that don't deep condition the hair very well, regardless of how long they are left on the hair.
Such formulas are mostly crème rinses or instant conditioners that are meant to coat the outside of the hair strands and give them a soft feel.
They also work very quickly and are meant for people that have very healthy, well-maintained hair.
Note: If your hair feels gummy or stretchy after you've used a moisturizing conditioner, be sure to add a protein-based conditioner to your next cleansing session.
3. Protein-based Treatments and Conditioners
These are primarily used for rebuilding the hair strands and work best when they are integrated into an already high-moisture hair care routine.
The frequency of using protein-based conditioners and treatments will largely depend on the strength of the product you're using and the amount of hair damage you're trying to correct.
Here's how to tell which one your hair wants. Healthy strands should feel pliable and strong. If your hair stretches further than usual before springing back, or feels limp and gummy when it's wet, that points to protein. But if it feels stiff and rough, or snaps rather than stretches, that points to moisture, and adding protein at that moment will only make things worse.
Note: If your hair feels dry or you notice breakage, then you should hold off on using protein conditioning. Be sure to follow the manufacturer's instructions carefully when using these products. Some of the protein re-constructors have very specific directions for usage.
Choose a protein treatment on the mild end of the spectrum for light touch-ups. A protein treatment on the mid-to-heavy end of the spectrum is meant for more intense protein conditioning and is ideal for color-treated hair and/or relaxed hair.
Overall, protein re-constructors should be followed by a good moisturizing deep conditioner in order to restore the natural pliability and moisture of the hair.
4. Leave-in Conditioner
These leave-in conditioners are largely optional but can be a helpful component of a healthy hair care regimen.
Leave-in conditioners usually help with hair detangling, especially after shampooing and conditioning, and can actually be used as water-based moisturizers for daily use.
5. Water-based Moisturizer
Usually used for daily supplementation of moisture, the best water-based moisturizers don't contain petrolatum, mineral oil, or lanolin.
Instead, they contain aloe or water as their first ingredient and often contain emollients and humectants that draw moisture into the hair to soften it.
We recommend moisturizing your hair once or twice a day before bedtime and in the morning.
6. Natural Oils
Natural oils are commonly used to seal in water-based moisturizer products and to help enhance the shine and pliability of hair. You simply need to first apply a small amount of the oil on the ends of the hair and then work your way up the hair strand.
Most oils sit on the surface, which is exactly what you want from a sealant. Coconut oil is the one exception worth knowing about: lauric acid has a strong affinity for hair protein and a small enough molecule to get inside the shaft, and coconut oil measurably reduced protein loss during washing in testing that compared it against mineral and sunflower oil, neither of which did. So it's worth reaching for as a pre-shampoo treatment specifically. It doesn't outperform other oils at sealing, though.
Some examples include olive oil, neem oil, argan oil, emu oil, coconut oil, jojoba oil, rosemary oil, tea tree oil, safflower oil, lanolin oil, sweet almond oil, Vatika oil, carrot oil, amla oil, and castor oil.
7. Protective Styling
If your goal is to grow long hair or retain your existing length, protective styling is an important part of any natural hair growth regimen.
A protective style is any style that reduces hair combing or manipulation, keeps the hair up and off the shoulders, and cuts back on the use of heat.
Spiral curls, buns, braids, and twist-outs are good examples of popular protective styles. Read this article to learn more about protective styling. Note that our definition is a little different than what you'll learn on most natural hair blogs.
Some women wear protective styles daily, while others reserve them for certain days of the week. Either way, keeping the ends protected is what preserves length over time.
8. Heat Reduction
Reducing the use of heat is another key component when it comes to healthy hair growth. Heat damages the protein structure of the hair and drives out its moisture, and the damage accumulates - it does not reset between sessions.
Two things decide how much harm you do: how hot, and how often. And there's a reasonably well-defined threshold involved. Work published in the International Journal of Cosmetic Science that heated hair progressively from 20 °C to 200 °C identified a critical temperature around 140 °C, roughly 285 °F. Below it, the changes were minor, reversible, and tied to water loss. Above it, the structural damage was profound and irreversible, with the cuticle scales folding and progressively disappearing.
Most flat irons run well above that line. Most blow-dryers on low or medium don't. So a cool blow-dry really is a different proposition from a flat iron at maximum, and one pass is different from four. Treat temperature and repetition as two dials you control, rather than treating heat as a single yes-or-no decision.
Using heat styling tools frequently on your hair, even with heat protectants, can be disastrous to your hair. Only hooded dryers offer the safest amount of heat, but they, too, have hot spots that can damage your hair over time.
So, limit the use of heat on your hair to once a week or less where possible, especially if you're just starting out on your healthy hair care routine.
Take an Honest Look
Just as it's important to know the kind of methods to use and incorporate into your regimen, it's also important to know when to stop and re-assess your methods.
If something isn't working for you, your hair will tell you either by breaking, feeling dry, or not growing new length over time. Although it might take you weeks or months of experimentation to get the perfect regimen, it will still come.
How to Choose a Good Moisturizing Shampoo

If you want more moisture in your regimen, the pairing that delivers it is a good moisturizing shampoo followed by a deep conditioner. Your daily water-based moisturizers help, but they can't carry the load on their own.
Get that pairing wrong and you'll spend the rest of the week fighting a losing battle on moisture balance.
When in search of the best moisturizing shampoo product, below are a few common things you need to keep in mind.
When the label tells you that the product is a "moisturizing shampoo" or the shampoo promises to "infuse your hair with moisture", this is not always true.
It is important to check these "claims" against the actual ingredients on the label of the product. It is the ingredients that will assist you in deciding if the formulation is, in fact, a moisturizing shampoo.
You should be looking for a shampoo that is able to balance its abilities to cleanse the hair along with moisturizing and softening the hair.
Porosity shifts where that balance should sit. Low-porosity hair resists water going in, which means it also resists product build-up coming out; it usually does better with a lighter, low-residue cleanser used a little more often, and with warm rather than cool water on wash day. High-porosity hair takes water on fast and gives it up just as fast, so it can carry a richer, more conditioning shampoo, and it'll benefit most from an acidic conditioner afterward to help your cuticle lie flat.
Does It Contain Harsh Sulfates?
The primary thing to look out for is whether the product contains sulfates. Sulfates are a type of detergent or surfactant that is commonly used in most shampoos to assist with cleansing the hair.
Some examples of common sulfates include sodium lauryl sulfate, ammonium lauryl sulfate, sodium laureth sulfate, and ammonium laureth sulfate.
The higher the levels of sulfates in a product, the more it can remove buildup and dirt from your hair and scalp. However, too many sulfates in a shampoo typically reduce its ability to moisturize your hair effectively.
Here are a few general rules when choosing a moisturizing shampoo:
If the shampoo contains multiple sulfates, stay away. Shampoos like these will not moisturize your hair very well, they are useful for removing product build-up, dead skin, and stubborn deposits.
Shampoos that contain sulfates are best for clarifying the hair rather than moisturizing it. A typical shampoo is mostly water - roughly 70 to 90 percent - with cleansing surfactants usually making up something in the range of 10 to 20 percent, and everything else sharing what is left. The more of that remainder goes to detergent, the less is available for conditioning agents.
You'll never see those percentages on a label. But what you can see is the order: ingredients are listed by descending quantity, so a sulfate in the first three positions is doing the heavy lifting, and one near the end isn't.
No official body classifies shampoos this way, so treat it as a rule of thumb rather than a hard category. Two or more sulfates high in the ingredient list usually means the formula is built to strip rather than to soften, and it'll fight you on moisture balance all week.
If you insist on using a moisturizing shampoo that contains sulfates, the laureth sulfates are more gentle on the hair compared to the lauryl sulfates. In addition, sodium myreth and tricedeth sulfates are more gentle derivatives.
This means a shampoo that contains these sulfates will offer you some amount of moisture depending on the other types of ingredients present in the formulation.
Does It Contain Gentle Surfactants?
Even when you try to stay away from stripping-sulfate cleaners, your shampoo will not be very effective if it is unable to remove product build-up and properly clean your hair.
The types of surfactants that you should expect to find in a moisturizing shampoo include hydroxysultaine, isethionate, sulfosuccinate, lauryl polyglucose, and cocamidopropyl betaine.
These ingredients are known as secondary surfactants and are much more gentle on the hair. The primary surfactants are harsh sulfates that we discussed earlier in the article.
Salon vs. Drugstore
Salon lines more often carry higher levels of emollients and conditioning oils that offset the sulfate detergents, and budget drugstore formulas more often lean on cleansers and water alone. But that's a tendency rather than a rule, and price is a poor proxy for it; plenty of drugstore lines are formulated by the same contract manufacturers as the salon brands.
Read the ingredient list rather than the price tag. A cheap shampoo with fatty alcohols and gentle secondary surfactants high in the list will treat your hair better than an expensive one built on two sulfates. Kira makes the same point from the other direction later in this article: some of the least expensive products she's used have worked the best on her hair.
How to Choose and Use a Moisturizing Deep Conditioner
Water-based moisturizers add daily moisture, but they're no match for a deep conditioner. It's the one product in this list we'd call non-negotiable.
Most deep conditioners contain some protein, usually silk or wheat. Both are gentle and they improve elasticity by helping your cuticle hold moisture, so seeing them on the label isn't a reason to put the bottle back.
What to Look For
1. Fatty Alcohols
When shopping for a moisturizing deep conditioner, look for a conditioner with a high "fat" percentage.
What does that mean?
You want a moisturizing deep conditioner that has lots of fatty alcohol in it. Fatty alcohols are hair-friendly alcohols and are unlike alcohols found in most finishing sprays, which often dry the hair.
Common fatty alcohols include stearyl alcohol, myristyl alcohol, cetyl alcohol, and cetearyl alcohol.
2. Emollients, Humectants, and Conditioning Agents
Humectants attract water. In humid air, they pull it toward your hair, which is exactly what you want. But in dry air they work in reverse. With no water to draw from the atmosphere, a humectant will take it from the only reservoir available, and that's your hair.
That's why a glycerin-heavy product that made your curls perfect in August can leave them brittle in January, and it's the most common explanation for the week-to-week inconsistency we described at the top of this article. As a rough guide, humectants behave well in moderate humidity and turn on you at the extremes: too dry and they dehydrate; too humid and they'll give you frizz.
Common emollients, conditioning agents, and humectants you want in a moisturizing deep conditioner include sodium lactate, glycerin, sodium PCA, propylene glycol, cetrimonium chloride, glyceryl stearate, polyquaternium, and other natural oils and waxes.
Correction to an earlier version of this article: hydantoin was listed here as a humectant. It isn't one. DMDM hydantoin is a preservative, and it protects a product from microbial spoilage by releasing very small amounts of formaldehyde.
Regulators consider it safe at the levels used in cosmetics, but it's a recognized contact allergen for a small share of people; a 2026 review of 158 studies put the rate at about 1.4 percent among patch-tested dermatitis patients. So if you know you react to formaldehyde, it's worth checking your leave-in products in particular. It just isn't something to seek out for moisture.
3. Silicones
The mention of silicones often elicits a lot of criticism from many hair-conscious critics (i.e., natural hair gurus); however, silicones actually work very well for most people.
Silicones have earned a bad rep on many natural hair forums and are considered to be a moisture-defeating, scalp-clogging, plastic-like hair coating. However, not all types of silicones are bad, and some are actually very useful.
Good silicones can help improve your ability to detangle wet hair. Some of the softness and sleekness you'll feel after rinsing out conditioners is due to some of the silicones within the product.
There's a limit, though. If the ingredient list reads water, silicone, silicone, silicone, that's not a deep moisturizer; it's a slip-and-shine product wearing a deep conditioner's label. It'll detangle beautifully and leave your hair dry underneath, because nothing is actually being deposited into the strand.
If you have a conditioner like this, consider using it as your final conditioning rinse; that's after you have done your main moisturizing deep conditioning.
Some silicones sit more breathably than others, and a few, amodimethicone in particular, cling to the shaft and won't come off without a clarifying shampoo. So if your deep conditioner is silicone-heavy, clarify at least twice a month.
If you wash your hair using a conditioner regularly (co-washing or Curly Girl Method) or wash your hair without shampoo, then you probably want to avoid silicone-rich products.
Things to Avoid
What are some of the ingredients to avoid in a moisturizing conditioner? Try and avoid moisturizing deep conditioners containing heavy proteins, mineral oils, petrolatum, and other similarly heavy oils.
These will coat your hair rather than feed it. And if your hair already struggles with silicones, it'll struggle with these too.
Other Moisturizing Conditioning Products
For water-based moisturizers and moisturizing leave-in conditioners, you want fats, emollients/humectants, water, and some detangling support from light oils or silicones.
On mineral oil specifically: in a rinse-out deep conditioner, it's largely washed away and unlikely to cause you problems. In a leave-in, it stays on your hair, and that's where it becomes a coating you didn't ask for. That distinction, rinse-out versus leave-on, matters more than the ingredient's reputation does.
How to Deep Condition, Step by Step
- Use Sulfate-free shampoo. Saturate your hair using warm water for about five minutes. Make sure that all topical dirt, oil, product build-up, and dead skin on your scalp and strands are removed before applying your moisturizing shampoo.
- Rinse your shampoo thoroughly. Apply your moisturizing deep conditioner and cover your hair with a plastic cap. Learn more about the baggy method with this article.
- Sit under a hooded dryer for roughly twenty minutes. Make sure that your dryer is set on low-to-medium heat. Please note that dryer times will vary depending on the product you are using and your preference.
- Rinse off the conditioner with cold water. Apply the leave-in conditioner and style as preferred.
Protective Styling and Length Retention
We've written a comprehensive article on hair growth, so in this article, I will only cover a few important highlights. Hair growth is a process that happens in 2 stages: emergence and retention.
The initial stage is pretty straightforward and involves the emergence of new hair from the hair follicles on the scalp. The process of emerging is natural and occurs unconsciously in human beings.
Apart from living a healthy lifestyle and eating a balanced diet, there isn't much you can do to improve the emergence of new hair from your scalp.
Most of us assume the answer is to speed that first stage up. It isn't, and it can't be. That leaves the second stage, retention, doing all the work.
Retention is what happens to your hair after it emerges, and specifically what happens to your ends. Unlike emergence, it depends almost entirely on how you handle your hair. That's the half you control, and protective styling is your main lever for it.
What Protective Styling Actually Does
Protective styling is somewhat self-explanatory. It involves the use of styles and techniques that protect the ends of hair from splitting, breaking, or otherwise becoming damaged.
Protective styling matters most for hair that's already fragile: chemically processed, color-treated, heat-damaged, or simply long enough that your ends have been through several years of wear. And when your hair is exposed to the elements outside, it'll begin to dry out.
Without incorporating protective styling techniques, the ends of your hair may suffer breakage and split, mostly caused by your hair rubbing back and forth across blouses, cotton shirts, or other clothing items.
If you allow this damage to continue for several weeks or months, your ability to retain your hair length may diminish significantly. This is when people often believe that their hair isn't growing, which isn't true in most cases.
Think of a wet sponge left out in the sun: the water evaporates, and what's left is dry and rigid. Hair left exposed behaves the same way.
Reaching New Lengths
Women often tell us they've reached lengths they'd never managed before, once they added protective styling to their regimen.
Here's what's actually happening there. Protective styling doesn't make your hair grow faster, and nothing can push a strand past the length its growth cycle allows. What it does is stop breakage from removing length as fast as your scalp produces it.
And there's research behind that distinction. A survey that measured hair length across four scalp regions in 1,042 schoolchildren found that combed natural African hair tends to reach a length steady state, a point where breakage and new growth cancel each other out and the hair simply stops getting longer.
The scalp never stopped producing. The ends were being lost at the same rate they arrived. For most of us, the gap between the length we have and the length we could reach is a retention gap rather than a growth gap, which is why closing it feels like sudden growth.
Plenty of women reach impressive lengths without ever wearing a protective style. In our experience, they tend to have something in common: very low heat and very low manipulation. If that isn't your routine, protective styling is usually how you make up the difference.
It isn't all-or-nothing. If the idea doesn't appeal to you, wear protective styles a few days a week and leave your hair out on the weekends. That alone will preserve length.
Types of Protective Styles

There are two main types of protective styles: complete and low manipulation. A natural hair care regimen should make use of both types of styling for the best results.
Complete protective styles involve having the ends of the hair out of sight. These styles protect the ends of your hair "completely," and examples are sew-in weaves, wigs, ponytails, tucked styles, and all varieties of buns.
Low manipulation styles, on the other hand, expose the ends of your hair to some extent. Although, they protect the hair by reducing the amount of manipulation (handling/combing) needed to maintain the hair.
Examples of these styles are twist-outs, braid-outs, pinned-up styles, cornrows, and braids (examples include box braids, goddess braids, poetic justice braids, crochet braids, and Ghana braids).
The most effective protective styles involve no heat at all.
Protective Styling for Short Hair
Short hair is a protective style by itself. The ends of your hair do not split or break from rubbing against your clothing or back during the course of the day.
With short hair, your only worry is protecting it from damaging elements like heat, cold, rain, and wind. Fortunately, this is pretty easy to do with the help of a hair moisturizer that seals the ends of your hair.
Hair at this length is usually very easy to manage and protect. However, you should keep your hair away from heat as it can still cause considerable damage. Only use heat when necessary.
The best protective styles for short hair include pin-ups, straw sets, bantu knots, twist-outs, and braid-outs. Some women use braids to help their hair to grow longer.
Once your hair reaches your shoulders, you can start wearing buns. Buns are simply one of the best protective styles available. Buns are effective, but only on hair that has reached certain lengths.
How Tight Is Too Tight
Protective styles shield your hair from the outside. But they can still damage it at the root if they pull. Sustained tension on the follicle causes traction alopecia, which is hair loss that typically starts at the hairline and temples and, once the follicle scars, doesn't grow back.
The American Academy of Dermatology names the same styles this section recommends: cornrows, locs, tightly braided hair, tight buns and ponytails, and weaves or extensions. It also notes that hair of African descent is more vulnerable to this kind of damage because of the shape of the follicle. If that's your hair, this section matters more, not less.
None of that is an argument against protective styling. It's an argument for limits:
- If it hurts, it is too tight. Pain, tenderness, a headache, or bumps along the hairline after installation are not the style settling in. A protective style should never hurt.
- Loosen the perimeter. The hairline and nape carry the finest strands and take the most tension. Ask for it specifically.
- Thicker, not finer. Thicker braids and locs spread the pull across more follicles.
- Six to eight weeks, then take it down — regardless of how well it is still holding.
- Rotate. Follow a tension style with a low-manipulation stretch so the scalp gets a break.
- Sewn-in rather than glued. Bonding glue adds chemical irritation on top of mechanical stress. The AAD publishes a separate set of precautions for weaves and extensions worth reading before your next install.
If you're seeing thinning at your hairline or temples, gaps widening between hairs, or bumps that don't settle, see a board-certified dermatologist rather than changing products. Traction alopecia responds to treatment while the follicle is still alive and stops responding once it scars, so this is a timing problem. No regimen on this page will fix it.
Kira's Natural Hair Regimen
Note that the remainder of this article was written by Kira Byrd, co-founder of Curl Centric. Whenever I think of creating or adjusting my natural hair regimen, Proverbs 22:6 resonates. "Train up a child in the way they should go, and when he is old, he will not depart from it."
The purpose of your natural hair regimen is to train your natural hair.
There are three questions that I want you to ask yourself when creating your regimen and buying products.
- Is this as simple as it can be? I strive to maintain a simple natural hair regimen.
- What part will this product play in my natural hair regimen?
- Should this be done weekly, every two weeks, or monthly?
Weekly or Every 2 Weeks
- Pre-poo
- Cleanse
- Moisturizing Conditioner
- Seal
Monthly
- Pre-poo
- Cleanse
- Protein Conditioner
- Deep Condition
- Seal
Your natural hair regimen does not have to be complicated, and you do not need a plethora of products.
Each element of your natural hair regimen should have a particular purpose. Each product that is a part of your regimen should serve as a primary contributor to that purpose.
This mindset will help you streamline your product selection, your usage, and your expenses. The essential elements of a traditional natural hair regimen are cleansing and conditioning.
However, naturally curly hair has additional needs including:
- Pre-pooing
- Cleansing (clarifying)
- Proteins
- Moisture conditioning (deep conditioning)
- Sealing
The specific purpose of each element of your regimen:
Pre-shampoo treatments should be used to add moisture to the hair. This is done before shampooing with harsh shampoos that strip the hair of its' moisture.
Kira’s Pre-poo Treatment Recipe
- ¼ cup of almond oil
- 2 tablespoon of melted shea butter
- 1 to 2 capfuls of olive oil
Directions: Mix all contents in a bowl. On wet or damp hair, pour the oil mixture over your hair. Cover hair with a plastic cap for about 10 minutes. This is done before washing or starting another treatment.
Cleansing is a two-part equation. It involves cleansing the scalp and cleansing the hair of old products (clarifying). It is critical to clean the scalp to rid it of environmental toxins and product build-up.
These toxins and build-up smother your scalp. That interferes with your scalp's ability to secrete its own natural oil, and blocked follicles can cause a host of other scalp-related issues.
Clarifying shampoos or cleansers strip the hair. This striping is almost to the point that the hair can "sing" or squeak. It gives the hair the ability to start over with a "clean" slate, so to speak.
Clarifying the hair before introducing a new product is the same as starting with a fresh canvas when you are painting. It gives you a starting point to determine the performance of the product on clean hair.
Clarifying ends the relationship of previous products with the hair by stripping them away. Clarifying should not be done on a regular basis. Adding this process to your monthly regimen or as needed will prove to be beneficial.
If you have extremely dry hair, clarifying should be minimized. If you use products that contain "cones", a moisturizing shampoo will not remove the "cones"; a clarifying shampoo is needed.
The clarifying shampoo that I use is Giovanni Tea Triple Treat Invigorating Shampoo.
Protein Conditioners - Mild protein help to moisturize and add strength to the hair strands. Healthy hair strands should be pliable and strong. They shouldn't be too stretchy (a sign that you need protein).
They also shouldn't be too stiff (a sign that you need moisture).
This is where the moisture-protein balance comes in. If you find that your hair is more elastic (stretchy) than normal, your strands may need protein.
Kira’s Protein Conditioner Recipe
- 2 medium egg whites
- ½ cup of Greek Style Yogurt
- Thai Kitchen Coconut Milk Cream
- 1 capful of olive oil
Directions: Mix all contents in a bowl. On clean, wet, or damp hair, pour the mixture over your hair and cover your hair with a plastic cap for about 15 minutes. Rinse with room temp water, not hot water.
You don't want to cook the egg whites, do you? Deep conditioning is a MUST after a protein treatment. Protein treatments should be done on an as-needed basis.
4. Moisturizing conditioners are one category of conditioning for hair. Particularly, moisturizing conditioners should do one thing. They should moisturize the hair with ingredients like humectants, emollients, and oils.
5. Deep conditioning is needed, especially after the hair has been stripped using harsh ingredients or after a reconstructing protein treatment. I use Giovanni Direct Smooth as Silk or a homemade recipe with a heating cap for at least 15 minutes.
Kira’s Deep Conditioning Recipe
- 1 medium avocado
- Thai Kitchen Coconut Milk Cream
- 1 - 3.5 oz container of baby bananas - if you use whole bananas, puree those bad puppies like your life depends on it! If it is chunky on your finger, it will be chunky in your hair.
6. Sealing your hair strands with oil or butter should be done to "trap" in the moisture from the water and deep moisturizing conditioner. The reason to seal while your hair is still damp is that water is the actual moisturizer - the oil or butter is only there to slow its escape. Seal dry hair and you are sealing in nothing. I like to use 100% yellow shea butter, almond oil, or avocado oil.
Sealing the hair should be done with every wash. Remember that a lot of products have dual purposes and can be doubled up instead of buying two products.
How heavy a sealant you want comes back to porosity again. Low-porosity hair is easily coated and stays wet a long time, so a light oil in a small amount is usually enough; heavy butters just sit on top and never absorb. High-porosity hair loses water quickly and generally needs a thicker cream or butter to hold it in, applied while your hair is still properly damp.
The last step is a cool water rinse. It feels good and it does your hair no harm, but the usual explanation for it, that cold closes the cuticle, doesn't hold up. The cuticle has no mechanism that responds to temperature, and water lifts the scales whether it's hot or cold.
What does flatten them is acidity. Your hair sits at a naturally acidic pH, and research on shampoo pH found that alkaline products increase the fiber's negative surface charge and the friction between strands, while formulas at or below about pH 5.5 reduce both. So if shine and smoothness are what you're after, an acidic conditioner or final rinse is the lever, not the temperature of the water.
Audit the Products You Already Own
It's time to go to the product cemetery and exhume the dead.
Take all of your hair products and accessories out of the closet or cabinet to see what you have. Take a heart-to-hair inventory of products and accessories that you have.
Make the decision to keep or trash products based on three things:
- Your budget
- Your desire to keep the product - only keep products that you will use
- The expiration date of the product
The easiest and the most expensive thing to do is throw it ALL in the trash and start over.
However, you could easily be throwing money away if you decide to repurchase these products later. Some products can serve dual roles. For example, oils that are used as your pre-poo can be used as your sealant and your body!
Expensive Products: To Buy or Not to Buy
I can honestly say that some of the most inexpensive "cheap" products have worked well on my hair. When I started my natural hair journey, cheap products benefited me in a major way.
They gave me the opportunity to experiment without paying an arm and a leg for products that I was unsure about. I know it may sound crazy, but sometimes you must stop and ask: What purpose will this product serve in my regimen?
Your answer has to be sound and logical. You have a choice to buy or not buy an expensive hair product. So what do you do?
When you're a new natural, try inexpensive products first.
Once you learn more about your hair, you can upgrade to more expensive products if you decide to do so. Also, please do not let the fact that a product smells good to be the deciding factor for your purchase.
Give Your Current Products a Chance
Giving your products a chance is about making a commitment, experimentation, and note-taking. Yes, you have to take notes. Plan to use products for four consecutive weeks before you make a decision to repurchase or discard them.
This should give you ample time to use the products in various ways to get a feel for what the products can do and to see if they live up to their purpose.
It is fair to expect that your hair's reaction may not be favorable at first. However, continued and consistent use can give a different result once your hair has a chance to adapt to the new products.
Before using new products, clarify your hair so that you can start with a clean slate.
Take Action
Clean out your product inventory.
- Take a picture of your product cemetery before you sort it. It is the fastest way to see how much you have been buying against how little you have been using.
- Write down what you are keeping and what each one is for. If you cannot name the job a product does in your regimen, that is your answer.
Keeping the Style: Maintenance and Night Care
Having a natural hair regimen is more than the products you choose to put on your hair. It also includes what you do to maintain your hair.
For many women with natural hair, the money and time spent on hair products and beauty shop visits reduce significantly.
So what's the problem, you ask?
Many women haven't settled on a natural hair maintenance regimen that will give them the results they want.
Learning to work with your hair's tendencies will reduce the stress and frustration associated with maintaining hairstyles. The style that you choose ultimately dictates how the style will be maintained.
The purpose of a maintenance regimen is to help preserve the freshness of your natural hairstyle for several days without having to do much else. The solution is to develop a natural hair maintenance regimen that will day in and day out give your hair what it needs.
Ask Yourself These Three Questions
- Does my maintenance regimen protect my natural hair?
- Does my maintenance regimen allow me to moisturize?
- Does my maintenance regimen produce the desired results all day?
Satin vs. Cotton
Protecting your hair from the wind and sun is crucial, but so is protecting your hair from lint and dryness. Lint, along with your hair's tendency to coil around itself, is the core of most knots.
I had a co-worker who was standing behind me and said, "Oh, let me get this knot out for you". I said, "Sure, but don't snap it off".
She gently untangled that bad boy, and a piece of lint from my sweater had curled itself up in my hair. If you are sleeping on cotton pillowcases, there are two culprits: lint and dryness. I've talked about lint, but dryness is so subtle.
Your cotton pillowcase is robbing you blind.
Why Cotton Costs You
The bigger problem with cotton is friction. A cotton weave has a rough surface, and a head that moves across it for seven hours drags the cuticle against it all night. That abrasion is what produces the frizz, the tangles, and the snapped strands you're finding in the morning. Satin and silk are smoother, so your hair slides instead of catching.
Cotton is absorbent, too. You've probably seen the demonstration where someone drops a cotton ball into a little water and it takes the water right up. Treat that as an illustration rather than proof, though; a cotton ball sitting in standing water isn't the same situation as a pillowcase against a hair fiber. Friction is the well-supported reason, and absorbency is a reasonable second one.
Either way, the fix is the same. Sleeping on a satin pillowcase or wearing a satin cap at night will work wonders, and if you want the comparison in detail we've got a full breakdown of satin versus silk. Just as our bodies need daily hydration, your natural hair needs to be hydrated as well.
One thing that I love about double-strand or 2 strand twists is that I can mist (add moisture) them at night. I use a water and oil mixture to mist my twist.
Then I put on a satin cap without suffering the repercussions of messing up my natural hairstyle. Once my hair begins to frizz, I create an updo style to wear for the next week.
Night Care by Style Type
Twist styles are low maintenance, and it's easy to wash your hair while twisted!
Many set styles have to be wrapped or pin-curled at night. Some of the common ones include twists, braids, bantu knot outs, and straight styles.
These styles cannot easily be moisturized daily. Understanding how often your hair needs moisture will help you choose natural hairstyles.
Maintaining a Twist-Out or Wash and Go
When I was a new natural, it took a while to gather the courage to wear my first wash and go. I was paranoid that my hair would dry out, frizz into a ball, or become flatter on one side.
I did have some frizzy hair accidents because I have hand-in hair syndrome (HIHS). HIHS affects the integrity of your set curl or twist pattern. I'd have to walk around with frizzed hair.
To combat the frizz on twist-out type styles, once I styled my hair, that's it. I leave it alone and don't touch it! Hand contact with the hair can cause frizz. When manipulating my hair, I wear rubber gloves.
I would rub the oil on my gloved hands and separate my curls, and do all manipulation at that time. I'd apply oil as needed to the gloves. This little trick has been a lifesaver!
I was convinced that I needed to carry at least an elastic headband with me, just in case. Then I remembered when I was relaxed, I carried hair accessories all the time.
Preserving or maintaining my natural hairstyle meant carrying accessories. I usually carry a headband, extra bobby pins, extra hair pins, and a wide-tooth comb.
So at any time, anywhere, I have what I need to have gorgeous natural hair all day long.
Create Your Natural Hair Regimen in 8 Simple Steps
- Take inventory of your current products.
- Understand the role that each product will have in your regimen.
- Create a monthly natural hair budget.
- Decide on your weekly, every two weeks, and monthly cleaning regimen.
- Use your products for four consecutive weeks to learn how to use the products.
- Find a few basic go-to hairstyles.
- Keep your hair moisturized.
- Protect your beautiful natural hair.
Related Articles
When to Talk to a Professional
Almost everything on this page is cosmetic, and cosmetic problems respond to regimen changes. A few things don't, and it's worth knowing which is which before you spend another three months experimenting.
See a board-certified dermatologist if you notice thinning or recession at your hairline or temples, widening part lines, bald or smooth patches, a scalp that's persistently itchy, flaking, painful, burning, or sore, bumps or pustules that don't settle, or shedding that's sudden, heavy, and unlike your normal shed. Hair loss is treatable in proportion to how early it's caught, and several causes, traction alopecia among them, stop being reversible once scarring begins.
Also worth a professional conversation: hair changes that arrive alongside pregnancy, a new medication, a thyroid or autoimmune diagnosis, or a significant change in your weight or diet. Those aren't product problems, and no shampoo will resolve them.
See a stylist or loctician for anything structural: removing severe matting, correcting a bad cut, taking down a style that's become painful, or moving between chemical processes. Doing those at home is where most of the damage in this category happens.
None of this is a reason to stop building your regimen. It's a reason not to let a regimen stand in for care you actually need.
What Is a Natural Hair Regimen?
A natural hair regimen refers to a series of steps and products that someone with natural hair uses on a regular basis. The regimen can include everything from washing and conditioning to styling and protecting the hair. Some people also incorporate natural ingredients, such as oils and butters, into their hair care routine.
Why Is a Hair Regimen Important?
A hair regimen is important to keep your hair healthy and strong. When you follow a consistent hair care routine, you can help to prevent damage, breakage, and other issues that can lead to hair loss or thinning. A hair regimen also helps to keep your hair looking its best by promoting shine, volume, and manageability.
What Should I Do to My Natural Hair Daily?
The daily needs of your natural hair will depend on your hair type, texture, and current condition. However, some general recommendations include: moisturizing your hair and scalp with water or a leave-in conditioner, using a wide-tooth comb or your fingers to detangle your hair gently, and protecting your hair with a satin or silk scarf or bonnet while sleeping, and keeping daytime styles loose — a ponytail or bun tight enough to feel is tight enough to pull hair out over time.
How Do I Start a Natural Hair Routine?
Do some research and experimentation to find what works best for your hair. Start by learning about your hair type, texture, and the specific needs of your hair. Consider factors such as how often you need to wash your hair, what types of products work best for your hair, and what styling techniques are most effective.
What Is a Good Hair Regimen for 4C Hair?
A workable 4C regimen is weekly cleansing with a moisturizing shampoo, a deep conditioner every wash day, a protein treatment roughly monthly, a leave-in and a sealing oil on damp hair, moisturizing again every one to three days between washes, and covering your hair at night. Adjust the frequencies to your porosity rather than to your curl pattern: low-porosity 4C hair usually needs lighter products and warmth to absorb them, while high-porosity 4C hair needs heavier creams and more regular protein. Keep protective styles loose enough that they never hurt.
Building your regimen is easier with numbers in front of you. Our free hair calculators and printables cover growth rate, shrinkage, and protective-style reference sheets.