


Protective styles have a reputation for being low-maintenance and easy to do, but that's not always the case. Preparing for and maintaining a protective style takes a lot of work if you want to keep your hair healthy.
They also ask you for something nobody puts on the salon menu. You need a sense of how much tension your hair can take before a style stops protecting your hair and starts costing you length.
That one variable decides almost everything else.
The same set of box braids can keep your ends safe for eight weeks or thin your hairline permanently. The difference isn't the style you chose; it's how tightly the style was installed, how long you wore the style, and what your hair had already been through.
So this guide covers both halves of the job.
Free 50-page guide
Your hair is already growing. The problem is keeping it.
On average, hair grows a third to half an inch a month, and curlier hair tends to grow more slowly. If your length looks stuck, that’s your hair breaking off as fast as it grows in. Here are the seven causes of breakage and the weekly routine that stops them.
Free. One email a week after that. Unsubscribe anytime.
We'll walk you through prepping, stretching, installing, maintaining, and taking down a protective style. We'll also show you how to tell whether the one you're wearing right now is too tight, using the warning signs a dermatologist looks for.

Why Are Protective Styles Important?
The basic concept of "protective styling" is to preserve your hair from damage. If one of your hair goals is to preserve your hair from damage, then you should incorporate protective styling into your natural hair regimen whenever possible.
Protective hairstyles are created to reduce ongoing manipulation of your hair, encourage growth retention, and protect the ends of your hair strands, reducing knots and tangles.

What Protective Styles Actually Do for Your Ends?
Before we get into any of it, here's the short version, because it reframes everything that follows.
A protective style does not grow your hair. Nothing you do on the outside of your head can reach the follicle, which is where growth actually happens. No braid, twist, or wig has ever changed that. What a protective style can do is stop you from losing the length your scalp has already grown.
That distinction sounds like a technicality, but it's the whole ballgame for textured hair, and there's a good piece of research behind it.
Why Length Retention Beats Growth
In 2007, a team led by Dr. Nonhlanhla Khumalo measured the hair of 1,042 South African schoolchildren and found something that deserves to be far better known than it is. (Khumalo & Gumedze, 2007)
Combed natural hair reached a steady length within about a year of a haircut and then simply stopped getting longer. It averaged 5.1 cm, no matter how long ago the last haircut had been.
Their hair hadn't stopped growing, though. The researchers concluded that "breakage eventually equals new growth." New length was arriving at the ends and snapping off at roughly the same rate, leaving the hair at a standstill.
That is the honest answer to the question so many women ask about their own hair, which is why it stays the same length year after year. It usually isn't a growth problem at all.
And it's exactly why protective styling earns its place in your regimen.
Every week your ends spend tucked away is a week they aren't being combed, rubbed against a collar, or handled on wash day, which is where most breakage comes from.
For context on the growth side, one study of 38 volunteers of African descent measured an average growth rate of 256 micrometers a day. (Loussouarn, 2001) That works out to roughly a third of an inch a month.
The individual range ran from 150 to 363 micrometers a day, a 2.4-fold spread in a very small sample. So treat any growth figure you see quoted, including that one, as an average with a lot of room around it.
How to Do Protective Hairstyles for Natural Hair
Before doing any protective style on your hair, you need to do some preparation. Preparation is the foundation of every single style, enabling your hair to handle the manipulation that protective styles require.
Prepping natural hair requires a series of steps, each one aimed at cleaning, nourishing, and moisturizing your strands so that the protective style won't cause damage or hair breakage. Also, prepping your hair will ensure that your scalp won't get dry, flaky, or irritated.
Now, let's get into the specifics of prepping your hair with a step-by-step guide infused with a few expert tips.

Shampoo Your Hair
The first part of hair prep is to remove dirt, oil, and product buildup from the hair.
When choosing a shampoo, we recommend using for a sulfate-free shampoo to avoid dry, crispy strands later. So, grab your shampoo, hop in the shower, and follow these steps.
- Pre-Rinse - The first thing you want to do is soak your hair. Make sure that it's drenched from root to tip before you add any product.
- Time for Shampoo - Grab a sulfate-free shampoo, take a bit, and apply it directly to your roots. Apply as much product as you need to cover the entire scalp before you start to work it in.
- Work in Shampoo - Using circular motions, work the shampoo all around your scalp using the pads of your fingers.
- Distribute - Move the shampoo down the length of your hair with your fingers. You don't want to leave the shampoo sitting on your hair, as this will dry your hair out quickly.
- Rinse - With your hair nice and clean, it's time to rinse out the product. Rinse thoroughly to make sure no shampoo is left behind.

Condition Your Hair
When conditioning naturally curly hair, focus on the ends, coating them with a moisturizing conditioner that prevents breakage and split ends.
Your ends are the oldest parts of your hair, and they need TLC. To condition, you'll need to:
- Apply Conditioner to your ends - Apply a natural moisturizing conditioner to the ends of your hair while it's still wet from shampooing. Don't be afraid to use a lot of hair conditioner, especially if your hair is thick or extremely dry.
- Work it in - Massage the conditioner into your ends until they are fully covered.
- Apply it all over - Apply the conditioner to the rest of your hair until it's all coated. Then, massage a bit into the scalp.
- Comb through - While your hair is coated in conditioner, begin detangling. Grab a wide-toothed comb and gently detangle from ends to roots.
- Let it sit - If you have time, put on a shower cap and let the conditioner sit for 15-20 minutes.
- Rinse - Now, it's time to rinse out the product. Make sure you rinse thoroughly so that there'll be no excess product left in your hair.

Moisturize Your Hair
With your hair clean and conditioned, it's time to moisturize. For natural hair, oils like argan and jojoba are great, and a little goes a long way. For an effective moisturizing session, follow these steps.
- Section the Hair - For optimal distribution, start by parting the hair into four sections (more if you have thicker hair).
- Twist - Twist each section down to the ends to keep them separate.
- Add Oil - Working section-by-section, add a few drops of oil or a bit of moisturizer and work it from roots to ends. Use a comb to aid in distribution.
- Repeat - Repeat until all of your hair has been moisturized.

Stretch Your Hair (Optional)
Some protective hairstyles don't require you to stretch your hair, and some do. There are three methods of stretching, all of which we'll share with you below.
We'll also share steps on how to do them correctly without breaking or tangling your hair.

Banding
Banding is a heat-free method of stretching the hair. You can band both wet and dry curly hair, and here is how to do it.
- Section Hair - Start by parting the hair using a comb to create at least four sections.
- Brush - With a Denman brush, brush through each section from root to tip to elongate hair.
- Make a Ponytail - Put a band at the roots of each section. Be sure not to make it too tight.
- Add Hair Ties - Starting with one sectioned ponytail, pull your hair down so that it's stretched all the way. Then start adding hair ties along the hair shaft until you get to the end. *Leave about ½ an inch between each hair tie.
- Repeat - Repeat the previous step for all sections, allow your hair to dry, and then remove the bands.
For Max Stretch - Use your Denman brush to brush your hair before adding each hair tie.

Blow Drying
Blow drying the hair to stretch it is an effective (and quick) method. When doing this method, be careful not to turn the heat up too high - doing this reduces the possibility of drying out or damaging your hair. To stretch curly hair with the blow-dry method, follow these steps.
- Section Your Hair - Use a comb or your fingers to separate your hair into at least four sections.
- Stretch It - Take one section and stretch it with your hands. *Be careful not to overstretch.
- Blow Dry - Being cautious of the heat setting (lower is better), move the blow dryer along your hair shaft from roots to tips until it's dry and stretched.
For Max Stretch - Use A Denman brush to brush through sections as you blow-dry.

Braiding
Stretching the hair with the braiding method is another way to go heatless. To stretch curly hair by braiding, here's what you'll need to do:
- Section Hair - Part the hair into two sections. *Do more sections for thick hair.
- Brush - Choose a section and brush through it with a Denman brush to get smooth strands.
- Braid - Braid the section down from roots to tips.
- Repeat - Repeat the previous steps for the rest of your hair.
- Wait - Leave the braids in your hair until they are totally dry.
- Remove the Braids - Take the braids out and brush through each section with a wide-toothed comb.
Choose the Right Protective Style for You

When choosing the right protective style for you, there's a lot to consider.
First of all, it helps to understand your hair type and density. For instance, fine strands snap under a weight that thicker strands would carry, so the size of the extension matters more if your hair is fine.
On the other hand, thin hair has a higher chance of breaking and is better suited to styles that don't require much tugging.
Second, it helps to know if you've got any summer plans, like going to the beach or hanging out in the sun.
You might think twice about getting crochet braids if you plan on going for a swim; instead, you may want to go with lemonade braids or box braids.
Third, it's essential to know how difficult it is to install a specific protective style. If you're new to doing protective styles on your own hair, we recommend starting with a simple protective style.
Lastly, you should consider how long a given protective style lasts. Protective styles could last anywhere from a week to two months. For braids specifically, how long braids can stay in depends on your edges more than the calendar. If you are looking for a long-term protective style, a low bun won't cut it.
Once you've considered these things, it's time to choose your preferred protective style.
Protective Styles for 4C Hair
If your hair is 4C, the retention argument at the top of this page is your argument. The Khumalo finding up there, that combed natural hair stops getting longer within about a year because breakage catches up with new growth, was measured on hair like yours.
That's what makes protective styling genuinely useful if your hair is 4C. It's also the pattern that's most likely to be kept in a style back to back, all year, with no gap. That habit is the risk, not any single install.
So the rules on this page matter more for your hair, not less. Keep your sections thick, keep the wear inside eight weeks, and take a real week or two off between installs. For a breakdown of each option, we've got a full guide to protective hairstyles for 4C hair, and our guide to 4C hair covers the pattern itself.
Protective Styles for Wavy Hair and Loose Curls
Protective styling gets written about as though it only applies to type 4 hair. It doesn't. If your hair is wavy or loosely curled, your ends get the same benefit from being put away over a winter or a swimming season.
The strand-thickness point above is the one that decides this for you, and it cuts across curl patterns rather than following them. Two women with the same waves can have completely different tension limits, and the person with the finer hairs may feel tension from a set of extensions her friend doesn't even notice.
So size the added hair to your strand rather than to your pattern, ask for fewer and thicker sections, and shorten the wear window. If your hair's fine, four weeks is a more sensible ceiling than eight. Our hair typing system guide will tell you which pattern you're working with, and it covers density and strand thickness alongside it.

Our Top 9 Protective Styles for Natural Hair
You've got a wide variety of protective style options to choose from. No matter your hair type, summer plans, or style preferences, we're sure there's one that will catch your eye.
For some ideas, check out these nine protective styles and how you can create them at home.
Note: Prep your hair according to the previous instructions before taking the following steps.
Cornrows
Cornrows are a great protective style that keeps your hair tame and your ends protected. The style lasts a week or longer, and when you take the braids down, you'll have a beautiful braid-out.
When creating cornrows, the only limit is your imagination.
You can go for simple straight backs or get creative with wavy, intricate parting designs. Also, you can play with the quantity of hair, creating small or large sections depending on the look you want to achieve.
To try out this fun protective style, here's what you'll need to do.
- Plan your design - As we mentioned above, there's a lot of flexibility here. Start by planning out your style.
- Part your first section - Part your hair with a rattail comb according to the design you'd like to achieve.
- Braid - Start by taking three sections at the root. Begin braiding and picking up sections of your own hair as you go.
- Repeat - Repeat the same process until all of your hair is braided.
Low Bun
Low buns are stylish, simple to pull off, and perfect for the summer. They keep the hair protected and the ends of natural hair tucked away.
There are a few things to watch out for when rocking a low bun as a protective style, including your hair type, strength, length, and the elasticity of the hair tie you're using. To create a stylish and protective low bun, follow these steps.
- Brush hair -Start by brushing your hair with a Denman brush until it's smooth and tangle-free.
- Apply a styler - Apply a styling gel or cream around the perimeter of your hair, avoiding the ends.
- Make a ponytail - Brush your hair back into a low ponytail about an inch or two from the nape of your neck. Use a boar bristle brush for this step.
- Create a bun - Place one hand at the base of your ponytail and swirl it into a bun.
- Secure - Secure the bun in place with either bobby pins or an elastic band with no metal pieces.
Afro Puff
Afro puffs are cute and easy to manage. They protect the hair by keeping it up and out of the way. The thing to watch out for is how tightly the puff is gathered. All of your hair is pulling from one point, and your edges take most of it, which is where traction damage starts.
Afro puffs come in many sizes and styles, all of which are gorgeous in their own way. To create an afro puff, here's what you'll need to do.
- Apply your styler - Begin by adding a styling gel or cream to the hair around the perimeter of your head.
- Brush your hair upward - Using a boar bristle brush, brush your hair upward.
- Create your puff - Put an oversized elastic band around your hair to create the puff.
- Lay your edges - Use a toothbrush and some edge control to lay your edges down.
Instead of adding product each day, wrap your hair in a scarf to make the style last.
Bantu Knots
Bantu knots are a spunky, bold protective style. While your hair is wrapped into Bantu knots, it's protected from manipulation and outside elements.
The style usually lasts about a week or longer, depending on whether you cover your hair up at night.
- Prepare your bands - Before you start making the buns, add oil to your elastic bands. The oil will prevent the bands from tugging or snagging your hair.
- Part the hair - Using a comb, part your hair into several sections. You can make the sections as large or small as you'd like.
- Secure each section - For each section, take a bit of gel, apply it around the section's borders, and brush it in with a boar bristle brush. Secure the section with an elastic band, making a ponytail.
- Make Bantu Knots - Starting at the base of one of the sections, twirl your hair to make a coil. Then wrap the coil around itself repeatedly to create a Bantu knot.
- Repeat - Repeat the previous steps for all of the sections.
Box Braids
Box braids are a trendy protective style that, when maintained properly, can last up to 8 weeks. It's ideal for the summer, as you can get box braids wet without any worry about messing up your style or damaging your natural hair.
Using synthetic braiding hair, you can create box braids of whichever length and size you want. You can even add colored extensions and embellishments. If you're going for traditional box braids, here's how you can achieve them.
- Part hair - Starting at the back of your head, create a horizontal section and clip the rest of the hair out of the way. Within that section, make a small box-shaped section (about an inch or so) and comb through it.
- Add braiding hair - Hold a one-inch piece of extension hair at the base of your first section. Getting as close to the root as you can, start braiding your natural hair into the braiding hair.
- Keep going - Once the braiding hair is incorporated, keep on braiding down to the ends. * To seal the braids and keep them from unraveling, dip the ends in hot water. This works on synthetic braiding hair only, never on your own hair or on human-hair extensions, and water straight off a rolling boil will scald you. Let it stand for a minute first, and keep it away from your scalp.
Senegalese Twists
Senegalese twists are two-strand twists built with smooth synthetic braiding hair, so each twist is sleek and defined instead of fluffy. They anchor at your root the same way braids do, and they're in the same tension band as the other twists in the table above, which is to say lower than a comparable set of braids.
Plan on four to six weeks. That's what stylists generally agree on, not research, and it isn't a number anybody has tested. The only published ceiling is the American Academy of Dermatology's six to eight weeks for braids and locs.
What's specific to Senegalese twists is the grip at your base. That braiding hair is slick, so it has to be held tighter at your root to stop the twist sliding, and that grip is exactly where the tension lands. If your parting lines are tender the morning after an install, your twists went in too tight. No amount of oil is going to fix that.
We've got a full walkthrough in our guide to Senegalese twists.
Marley Twists and Passion Twists
Both styles swap that slick braiding hair for a textured one. Marley hair is textured, so the twists sit closest to your own texture, and they're the pair most people can't tell from natural hair at a glance. Passion twists use a wavy, glossier braiding hair that holds a springy curl the whole way down. The wear window is the same four to six weeks for both.
The tradeoff with textured braiding hair is that it slips. A twist unraveling at the root tempts you into retwisting the same few inches every week, and that repeated pull on one spot of your scalp does more damage over six weeks than the install ever did.
So retwist your edges as rarely as you can stand it. When your roots stop holding, take the twists down instead of tightening them back up; your roots have told you these twists are finished. Our guides to Marley twists and passion twists cover the install for each.
Crochet Braids
Crochet braids get their name from the tool, not the technique. Your own hair goes into a cornrow base first, then loops of prepared hair get pulled through that base with a latch hook. Your strands aren't what's holding the piece up.
The table above makes the point that matters here, which is that the piece isn't what pulls on you and the base underneath is. What that means in practice is you can't judge a crochet install by how the hair feels. Part it and look at the cornrows themselves, because a loose, comfortable piece sitting on a base that went in too tight is still pulling on your hairline.
Four to six weeks is the usual window, and the install is the fastest here at thirty to sixty minutes once your base is done. The one season to skip crochet braids is swimming season, as we said further up. A dense piece over a cornrow base holds water against your scalp for most of a day, and that's how a good style turns into an itchy week. Our guide to crochet braids has the full method.
Faux Locs
Faux locs wrap braiding hair around your own braids or twists to imitate mature locs, and they come off cleanly when you're done. They're also the most demanding style in this section. The install runs three to five hours, and the wrapping adds weight along the whole length rather than just at your root.
Weight is the whole story with faux locs. The thicker-and-shorter rule from the traction section applies here more than anywhere else on this page, because the wrapping puts weight along the entire strand instead of only at your root.
So ask for shorter locs than you think you want on your first set, and give your hair a proper rest afterward. You can always go longer next time. Our guide to faux locs covers sizing, braiding hair, and take-down.

How Long Should Protective Styles Last?
Almost every wear time you'll read online is somebody's opinion, passed along often enough that it started to sound like a rule. There's one number that isn't, and it's worth knowing where that line actually sits.
The American Academy of Dermatology puts the ceiling for braids and locs at six to eight weeks. Past that point, two things start working against your hair at once. The pull has had longer to do its damage, and the take-down gets harder as weeks of shed hair mat into the style.
The table below is also on our Protective Style Planner, along with the tension check and the take-down math. Go there if you just want the tools.
How Long Should Protective Styles Last?
Twenty-two styles, sorted by what's actually carrying the weight.
| Style | Typical wear | Tension load | Take-down | Gets wet? |
|---|---|---|---|---|
| Braids with hair added | ||||
| The braiding hair is attached at your root, so its weight hangs on that one follicle for every single day you wear the style. Part the sections smaller and you spread the same weight over fewer hairs. | ||||
| Box braids | 6-8 weeks | High | 2-4 hours | Yes |
| Knotless braids | 6-8 weeks | Moderate | 2-4 hours | Yes |
| Micro braids | 4-6 weeks | High | 4+ hours | With care |
| Cornrows | 2-4 weeks | Moderate | 30-60 min | Yes |
| Feed-in braids | 4-6 weeks | Moderate | 1-2 hours | Yes |
| Lemonade braids | 2-4 weeks | High | 1-2 hours | Yes |
| Tribal / Fulani braids | 4-6 weeks | Moderate | 2-3 hours | Yes |
| Twists with hair added | ||||
| Twists attach at the root the same way braids do, but they usually use less hair in bigger sections. That means less weight per follicle, and a much faster take-down, which matters more than it sounds like it should. | ||||
| Senegalese twists | 4-6 weeks | Moderate | 1-2 hours | With care |
| Marley twists | 4-6 weeks | Moderate | 1-2 hours | With care |
| Passion twists | 4-6 weeks | Moderate | 1-2 hours | With care |
| Your own hair, nothing added | ||||
| Nothing extra is hanging on your strands here, so the only tension is whatever your hands and your hair tie put there. Luckily, that is the one thing you control completely. | ||||
| Two-strand twists | 1-2 weeks | Low | 20-40 min | Yes |
| Flat twists | About 1 week | Low | 15-30 min | Yes |
| Bantu knots | 3-7 days | Low | 10-20 min | Yes |
| Halo / crown braid | 3-5 days | Low | 10-15 min | Yes |
| Low bun | 2-3 days | Moderate | Minutes | Yes |
| Afro puff | 2-3 days | Moderate | Minutes | Yes |
| Locs and loc styles | ||||
| Locs carry their own weight all the time, so the trouble spot is your roots when they get retwisted too tight. Temporary loc styles often add hair, which is a different problem. | ||||
| Faux locs | 4-6 weeks | High | 3-5 hours | With care |
| Butterfly locs | 4-6 weeks | Moderate | 2-4 hours | With care |
| Starter locs | Permanent | Moderate | Not removable | Yes |
| Wigs, weaves and crochet | ||||
| The piece itself doesn't pull on your hair at all. What carries the whole load is the braided base underneath it, and that's exactly the part everyone forgets about. | ||||
| Crochet braids | 4-6 weeks | Moderate | 30-60 min | With care |
| Sew-in weave | 6-8 weeks | High | 1-2 hours | With care |
| Wig over a braid-down | Daily, off at night | Low | Seconds | Yes |
One number here is real research. The rest isn't, and we'd rather say so. The six-to-eight-week limit comes from the American Academy of Dermatology, and it applies to every style here. Everything else in the Typical wear column is what stylists generally agree on. Nobody has ever run a study comparing these styles to each other. Tension load is our own read on two things you can see for yourself: how much hair gets added, and whether it's attached at your root. A style in the Low column that goes into your hair too tight is still too tight.
One column there deserves a word of explanation.
Tension load isn't a measured ranking of any kind. It's our reading of two things you can see for yourself: how much additional hair gets added to your natural hair, and whether that added hair anchors at your root. A style sitting in the "Low" band that's installed too tight is still too tight.
Can Protective Styles Cause Hair Loss?
Now for the part most protective styling guides leave out, which has always seemed strange to us, because it's the thing readers ask about more than anything else.
The hair loss that protective styles can cause has a name. It's called traction alopecia, and it's the most preventable form of hair loss there is, right up until the point where it stops being preventable at all.
The mechanism is simple enough to hold in your head.
Constant tension irritates the follicle, and if the pulling continues, the follicle shrinks and eventually scars over. Once scar tissue has replaced a follicle, nothing will regrow from it again. Catch it early, and your hair comes back completely; catch it late, and it doesn't come back at all.
So everything worth doing about it happens in that early window.
What Traction Alopecia Looks Like
It takes your edges rather than your crown, and that one detail does more diagnostic work than anything else here. Central centrifugal cicatricial alopecia, the other scarring hair loss common in Black women, starts at the top of the head and spreads outward instead. So where the thinning sits tells you a great deal about which one you have.
The classic sign has a name of its own. It's called the fringe sign. A thin line of short, fine hairs stays behind in front of the thinning patch, so your hairline ends up with a wispy border in front of a bare strip. In one series of 30 patients, it turned up in 27 of them.
Where Does the Damage Show Up First?
Two places to check on your own head, in the order they tend to go.

- 1Your front hairline. This is where the thinning tends to start. You won’t spot it by looking today, though. The only way to see it is to hold your hairline up against a photo of yourself from a year or two ago.
- 2Your temples, just in front of your ears. The easiest spot to miss, because you never really look at it. What you’re checking for is a thin line of short, fine hairs sitting in front of a barer patch. Doctors call that the fringe sign, and it turned up in 27 of 30 patients in one study.
There’s a third one we can’t really mark on a photo, and that’s the partings themselves. Smaller sections mean a whole braid’s worth of weight is hanging on fewer hairs. That’s why dermatologists tell you to ask for thicker braids rather than finer ones. It feels backwards until you think about where the weight is going.
One detail worth holding onto: this kind of hair loss takes your edges, not your crown. The other scarring hair loss that’s common in Black women works the opposite way round. It starts at the top of your head and spreads outward, and it’s called CCCA. So where your thinning sits tells you a lot about which one you have.
Who Is Most at Risk
There's one risk factor that dwarfs all the others, and if you take nothing else away from this article, please take this one.
In a study of 574 schoolgirls and 604 women, braids and weaves worn on chemically relaxed hair came with traction alopecia about three and a half times as often as the same styles worn on natural hair. (Khumalo et al., 2008) That is the largest effect anyone has measured on this subject, and the study's own margin of error still puts it somewhere between roughly two and six times as often.
The literature has its own blunt way of summarizing that finding: no braids or weaves on relaxed hair.
That doesn't mean you can never do both, and we're not going to pretend otherwise. It does mean that if your hair is relaxed, texturized, or growing a relaxer out, your wear times need to be shorter and your tension lower than the advice you'll find anywhere else. Check more often, too.
Traction alopecia was close to twice as common in adults as in under-eighteens. And symptoms tied to braiding predicted the disease more strongly than symptoms tied to chemical processing did.
The Warning Signs Come First
This is the most useful number in the entire body of research on the subject, and almost nobody quotes it.
Among the women and girls in that study who had traction alopecia, only 18.9% had never experienced a hairdressing-related symptom. (Khumalo et al., 2008) Turn that around and it says roughly four in five of them felt something coming first.
The soreness, the tender spots, the little bumps at the base of the braids were never the style settling in, which is how most of us learn to read them. They were the warning.
The study did not rank those symptoms against each other, and we are not going to invent an order for them. What it reported is simpler and more useful: symptoms tied to braiding predicted the disease more strongly than symptoms tied to chemical processing did, and having had hairdressing symptoms at all is what separated the women who developed traction alopecia from the women who did not.
So when a style hurts, that isn't the price your hair pays for a neat install. It's information, and it tends to arrive early enough that you can still do something useful with it.
Is Your Protective Style Too Tight?
We built the check below out of those findings so that you can run it on your own head tonight, without waiting for an appointment.
Work through it honestly, including the two questions at the bottom about relaxed hair and how long your style has been in. Neither of those sets off a verdict on its own, but both of them change what the rest of your answers mean.
Is Your Protective Style Too Tight?
Eleven things dermatologists look for, in language you can use on your own head tonight. And here's why it's worth doing, of the women in one study who lost hair to pulling or tension, only 18.9% had never felt a warning sign first. Four out of five felt it coming.
What you can feel
What you can see
Two things that change what the rest of this means
One thing this can't do is diagnose you. Only a board-certified dermatologist can tell you for certain whether what you're seeing is traction alopecia. That's the medical name for hair loss caused by pulling. What we can tell you is why checking early beats checking late. Caught in the first stage, your hair grows back completely. Left alone long enough, the follicle scars over and it doesn't. The signs above come from the American Academy of Dermatology and from three published studies. The largest followed 1,178 South African women and girls.
Protective Style Maintenance: Scalp, Edges, and Ends
To keep your protective style in tip-top shape, you'll need to do a few things.
First of all, if your hair appears to show signs of buildup, you should wash it. When washing your hair while it's in a protective style, take your time and be gentle, so you don't create unnecessary frizz.
Note: Washing your hair may not always be possible while it's in a protective style. For this reason, you should only apply styling products to your hair when absolutely necessary.
If you wear wigs as a protective style, the key to keeping the wig looking good is to keep it moisturized. But don't forget your natural hair under the wig - every week or so, you should wash, condition, and moisturize your hair.

How Do You Wash Your Scalp in a Protective Style?
Six weeks is a long time to leave a scalp alone. "You can't wash braids" is one of the more stubborn pieces of bad advice in natural hair care. You can wash them, and you should; you just wash your scalp rather than your hair.
Dilute a gentle shampoo with water in an applicator bottle, part along the braid rows, and apply it directly to the scalp underneath. Massage with the pads of your fingers rather than your nails. Resist piling your hair up or scrubbing across the rows, because that's what turns a wash into two hours of frizz.
Then rinse for considerably longer than feels necessary. Product left sitting between your braids is exactly what becomes buildup, and buildup is one of the two reasons women end up taking a style down weeks earlier than they planned to.
Drying matters just as much as washing. A damp scalp underneath a dense style is how you end up with an itchy, sour-smelling week. Sit under a hooded dryer on a cool setting, or give your hair real air time before you wrap it for bed.
What Are Those White Flakes on My Hair?
At some point in a long protective style you'll notice small white or yellowish specks on your hair near the scalp. Almost everyone reads them as dandruff or ordinary product buildup. Sometimes that's exactly what they are, and a good clarifying wash sorts them out.
Sometimes they're something else entirely.
Hair casts are small cylinders of follicle sheath that wrap around your hair shaft and slide freely up and down it, and they gather around hair that's being pulled. Their presence means mechanical traction is still on your strands, which puts them in a completely different category from buildup. Flakes of product sit loosely on the strand, and a nit is cemented to it and won't move at all.
So pinch one between two fingers and try to slide it along the hair.
If it travels freely up and down the strand, you're looking at a hair cast, and it belongs on your tension list rather than your wash list. Washing won't clear it, and re-installing the same style any tighter will make it worse.
How Do You Sleep in a Protective Style?
Six weeks of wear is also about forty nights of your hair getting pressed, dragged, and gathered while you're not awake to notice it. Nobody counts those nights. They're a real part of what a style costs you.
Two things happen overnight. Cotton pulls moisture out of your hair and creates friction against it, and whatever you gather your hair into puts tension on the same patch of your scalp for eight hours straight. Neither one has been studied against traction alopecia, so treat what follows as mechanism and field consensus rather than research.
Sleeping in Box Braids and Twists
Gather your braids loosely on top of your head, secure them with a satin scrunchie rather than an elastic, and put a satin or silk bonnet over the whole thing. The gather is the part people get wrong. A high, tight gather is a nightly afro puff, and it pulls from the exact spot your edges are already carrying the install from.
So keep the gather loose enough to slide a finger under, and move it every few nights so one section of your scalp isn't taking it every time. If your braids are long enough to sleep on, add a satin pillowcase under the bonnet. Your ends work their way out of a bonnet by about three in the morning.
We cover the full routine in our guide to sleeping with braids.
Sleeping in Faux Locs and Crochet Braids
Both of these are heavier than they look, and weight behaves differently lying down. Faux locs pull on your roots whenever you sleep on the side they're lying on, so a loose gather up and off your neck does more here than a bonnet alone does.
Crochet pieces have the opposite problem. The added hair tangles against itself at your nape overnight, and the morning detangle is where the cornrow base underneath gets tugged.
So twist the piece into two loose sections before bed, or braid it loosely. It'll come apart in the morning instead of matting.
Our overnight hairstyles guide covers the options for both, and our satin versus silk comparison covers what to sleep on.
When to Take Out Protective Styles
Each style has an expiration date, so understanding the signs is crucial. The most obvious sign that you need to take out your protective style is new growth at your roots, which is easier to spot in some hairstyles than others.
For instance, with box braids, the roots show; this makes it easy to gauge whether you need to take the braids out.
Another telling sign is product buildup, which usually appears around the roots as a white, flaky substance. Not everything white at the roots is buildup, though, and the difference matters - see below.
Product buildup is normal, caused by a mix of product, dirt, and oil. If you begin to get product buildup that you can't wash away, it's time to take the style down.
Here are a few common protective styles and how long they last:
- Box braids and yarn braids: 6 to 8 weeks
- Twists with extensions: 4 to 6 weeks
- Bantu knots: 3 to 7 days. High puff and low bun: 2 to 3 days
- Lemonade braids and other cornrow styles: 2 to 4 weeks
Six to eight weeks is also the outer limit the American Academy of Dermatology gives for braids and locs generally, whichever style you're wearing.
Pro tip: After taking down a protective style, let the hair rest for a week or two. This will limit hair damage from over-manipulation.

Why Does My Hair Shed So Much When I Take Braids Out?
Nearly everyone has this moment once. The braids come out, a startling amount of hair comes out with them, and there's a pile in the sink big enough to make you feel genuinely sick.
Here's what's actually happening, and it's arithmetic far more often than it's damage.
You shed somewhere between 50 and 100 hairs a day, which is normal and happens whether your hair is loose or braided. On an ordinary week those hairs wash out on wash day and comb out in between, so you never see more than a few of them at a time. In a protective style they have nowhere to go, so they stay woven into the braid until the day you take it down. Then all six or eight weeks of them arrive at once.
Why Does My Hair Shed So Much When I Take Braids Out?
If you've ever taken your braids out and felt sick at the amount of shedding you experienced, this chart is for you. Move the slider to however long your hair was installed for a shedding estimate.
| Time in | Days | Shed hairs held in the style |
|---|---|---|
| 2 weeks | 14 days | 700-1,400 hairs |
| 4 weeks | 28 days | 1,400-2,800 hairs |
| 6 weeks | 42 days | 2,100-4,200 hairs |
| 8 weeks | 56 days | 2,800-5,600 hairs |
| 12 weeks | 84 days | 4,200-8,400 hairs |
Where these numbers come from. The American Academy of Dermatology puts normal shedding at 50 to 100 hairs a day. The rest is just arithmetic, and it's ours rather than anyone's research. While your hair is braided or twisted up, the hairs you shed have nowhere to go. So they sit there instead of washing out on your wash day. Treat these as the high end, though, because some of them do work loose while you're wearing it.
One honest caveat on those numbers: treat them as an upper estimate, because some hairs do work themselves loose during the wear. There's also a reliable way to tell shedding from breakage, and it matters, because the two call for completely different responses from you.
A shed hair is full length and has a small white bulb at one end, which is the root that finished its cycle and let go. Broken hairs are short, uneven, and have no bulb on them at all. A pile of long hairs with bulbs is your normal shedding catching up with you, while a pile of short snapped pieces is your style telling you something you need to hear.
How Do You Take a Style Down Without Breakage?
Take-down is where a good protective style goes wrong most often, and it's almost always for the same reason. It gets rushed at the end of an already long day.
Give it more time than you think you need. Two unhurried hours will protect the six weeks of length you just spent six weeks saving, and hurrying is the single most reliable way to undo all of it in one evening.
Start by soaking the whole style in a slippery conditioner. Take-down is friction from beginning to end, and conditioner is what turns that friction into slide, so work it through the length properly before you unpick anything.
Then work through it in this order:
- Cut the extension hair down first, to just below where your own hair ends. Less weight and less length means less to drag through your strands as you unravel.
- Unravel from the ends upward, one braid at a time, and never pull a braid apart starting from the root.
- Separate the shed hair out as you go rather than letting it collect. That matted cuff at your root is weeks of shedding gathered in one place, and it will take live hair with it if you force it through.
- Detangle each section before it touches the next one, then twist it loosely and set it aside. Loose hair joining other loose hair is how a two-hour take-down becomes a five-hour one.
- Stop when you get tired. Half a head of braids will keep perfectly well overnight, and a section you rip out at midnight will not have grown back by morning.
Wash and deep condition afterward rather than before. Your hair has been holding one shape for weeks, and it's carrying weeks of product with it. It will feel like straw until it's properly cleansed and rehydrated, which is normal rather than a sign of damage.
How Long Should You Rest Between Styles?
You'll usually see this framed as letting your hair breathe. Your hair isn't breathing, though. It stops being living tissue the moment it leaves the follicle, and your scalp takes its oxygen from your bloodstream rather than from the air.
The rest period is still real and still worth taking. The reason behind it is just different from the one you've been given.
What's recovering during those weeks is the follicle itself, after weeks of steady pull, along with the skin around it. You also need a clear stretch of time to cleanse properly, deep condition, and trim the ends that took the worst of the take-down. None of that is possible with a fresh install sitting on top of your hair.
One to two weeks is the usual recommendation, and we'd treat that as field consensus rather than research, because nobody has actually studied what the right interval should be. If your last style left your scalp tender, itchy, or bumpy along the hairline, give it longer than that, and don't book the next appointment until those symptoms have completely gone.
The one thing genuinely worth being strict about is the pattern rather than any single style. Going straight from one long-wear style into another, month after month with no real gap, is what shows up in the research far more than any particular braid does.
Do Protective Styles Really Protect Your Hair?
The simple answer is that it depends. Factors that determine whether a protective style is actually protective include:
- The amount of TLC you give to your hair before, during, and after doing a protective style.
- How much tension is involved in the styling process? Tension is not healthy for the hair, causing it to weaken and break.
- Whether heat is involved. Protective styles requiring heat application carry the risk of heat damage.
Choose protective styles that don't require heat or excessive tension. Also, make sure that you adequately prep and maintain your hair.
Pros and Cons of Protective Styles
Protective styles come with both advantages and disadvantages. Let's jump right into the pros and cons below.
Pros
- Some protective styles keep the hair and ends tucked away to prevent damage and allow the hair to rest.
- Some protective styles are easy to create and maintain (afro puffs and low buns).
- Protective styles allow you to be carefree, not worrying about what you're going to do with your hair every day.
Cons
- Some protective styles require a lot of practice, time, and effort to install.
- Wearing the same protective style repeatedly or longer than recommended can cause traction alopecia and breakage. That risk is covered in full further up this page, because it deserves more than a bullet point.
Dos and Don'ts of Protective Styles
To ensure that your protective style endeavors don't end in ruin, we'd like to share some helpful dos and don'ts.
Do
- Take time when prepping your hair to minimize breakage and damage.
- Watch for signs of buildup while wearing a protective style.
- Take a moment to research specific protective styles before doing them on yourself.
Don't
- Wear protective styles for longer than recommended.
- Pull or tug on hair too tight during the styling process.
- Add hair that's too heavy for your strands.
- Allow someone without prior experience to do a protective style on your hair.
Before You Leave the Chair
The conversation that prevents most of this, written out so you can read it straight off your phone.
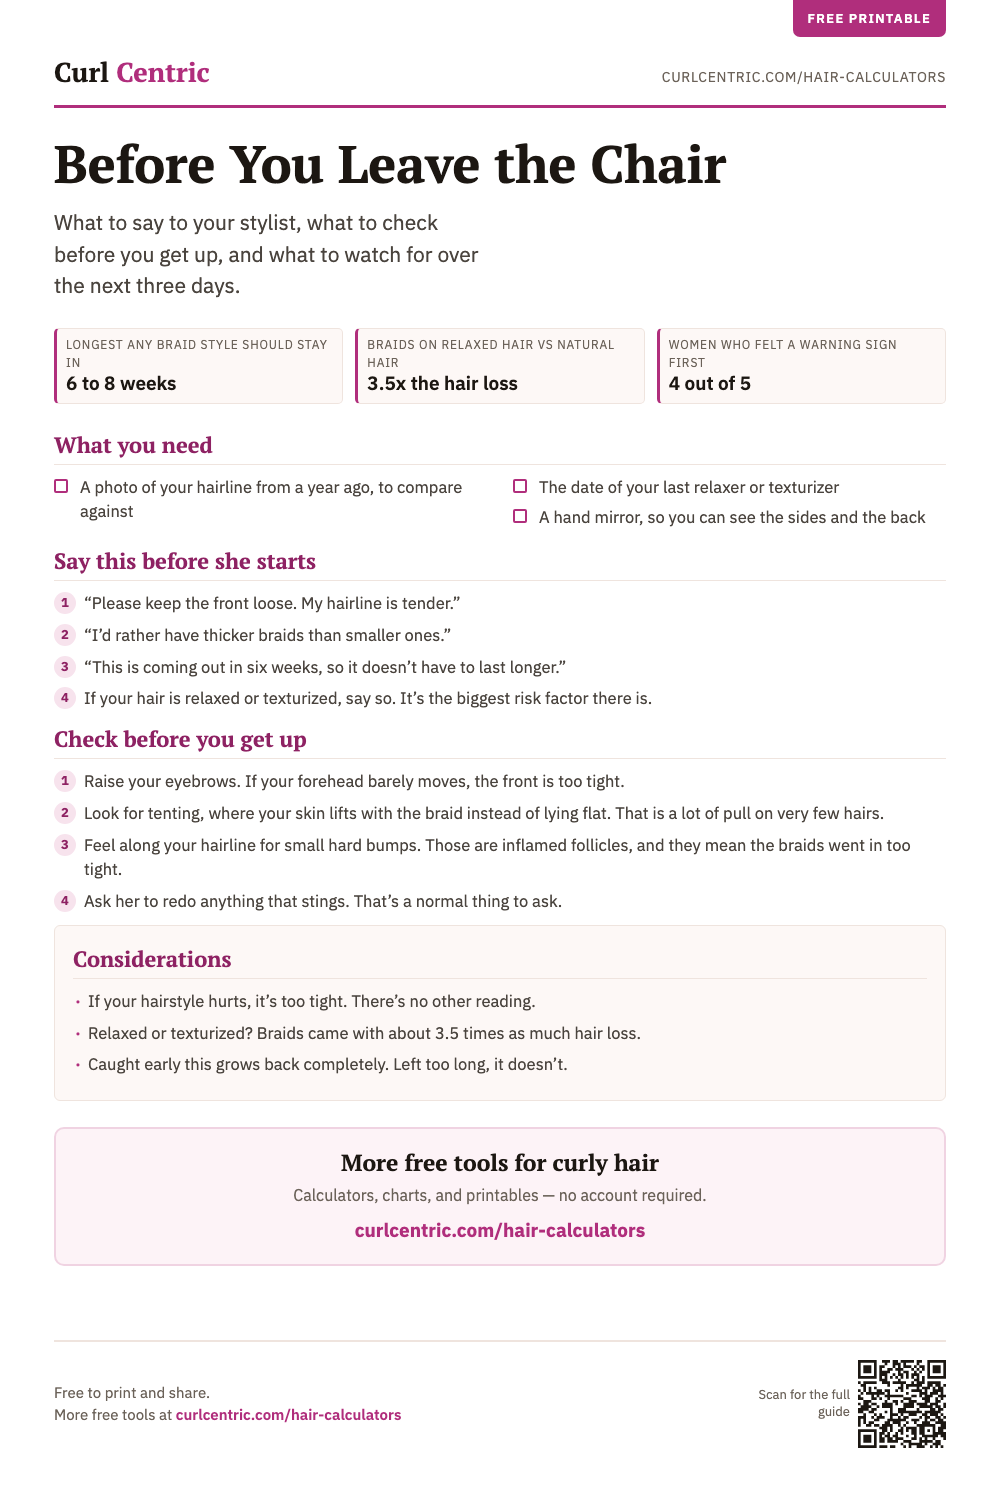
Almost everything on this page comes down to about ninety seconds, and they happen before the first section of your hair gets parted. It’s a hard thing to bring up, though. You’re in the chair, she’s the professional, and "that feels too tight" can come out sounding like a complaint when you don’t mean it as one.
So we wrote the words down for you. One page, and it covers what to say before she starts, four things to check before you get out of the chair, and what to watch for over the next three days. It’s free, and there’s no email to hand over.
Download the PDFPrint it out, or just keep it open on your phone at the salon. It’s part of our free tools and printables, all of which are free to use.
The Truth about Protective Styles
There is often a lack of understanding within the natural hair community of exactly what protective styling really means. Let me explain why protective styling is so important.
Failing to incorporate protection into your natural hair regimen is one reason several women experience excessive hair breakage and fail to retain their desired hair length.
Furthermore, protective styling, an acceptable term within the natural hair community, is admittedly limiting and leaves out an essential component.
Usually, when we refer to the concept of protective styling, we're speaking specifically about the various protective hairstyles that can keep your ends safe and tucked away - protected.
However, protective styling is only one component of your journey. You must focus on your entire natural hair regimen and look for ways to incorporate more protection across the board.
The term protective styling is often used in a limiting fashion. It should really refer to the process used to style your hair and not the actual style that you choose to wear.
The actual style that you decide to wear should be referred to as a protective hairstyle. It can be confusing when you think about it, but let me clarify why the distinction is so important.
Protective styling is really about increasing the number of good things you do for your hair and decreasing the number of bad things you do to your hair.
Let's look at an example of how you can incorporate more protection into your natural hair regimen. If you fail to take your time and be gentle when combing your hair, it's relatively easy to stress your hair strands and cause unnecessary breakage.
You can incorporate more protective styling to mitigate this potential cause of hair damage. For example, use wide-tooth combs, seamless bone combs, or incorporate finger combing into your regimen.
If you decide to incorporate finger combing as a protective measure, be sure to remove any jewelry that you're wearing and make sure your fingernails are well-trimmed.
Keep in mind that this is just one example of how you can mitigate potential hair damage when styling your hair by incorporating more protective styling into your natural hair regimen.
What Are Protective Styles?
Protective styles are designed to protect hair from damage and breakage. They typically involve low-manipulation techniques that minimize tension, pulling, and styling stress on the hair. Protective styles include braids, twists, buns, weaves, wigs, and other styles that keep the ends of your hair strands tucked away. These styles not only help to protect the hair but also provide a break from daily styling.
Do Protective Styles Make Hair Grow Faster?
While protective styles do not directly make hair grow faster, they promote hair growth by protecting the hair from damage and breakage. When hair is constantly exposed to heat, chemicals, and styling stress, it can lead to damage and breakage, which can slow down hair growth. Protective styles minimize this damage so the hair can grow more freely. Growth happens down in the follicle, below the skin, where no style can reach it; what a protective style changes is how much of that growth your hair actually keeps.
Which Protective Styles Help with Length Retention?
The ones that put your ends away and then leave them alone. Length retention is about keeping the length you already grow rather than growing faster, so what you want is low tension and low manipulation at the same time. Braids, twists, buns, weaves, and wigs all do that when they're put in loosely and come out inside their window. Installed tight or worn for months, those same styles start costing you the length you were trying to keep, which is the trap. Your ends are the oldest hair on your head and they break before anything else does, so a style that tucks your ends fully away retains more than one that leaves them hanging loose. Thicker sections, added hair light enough for your strands, and a real rest between installs do more for your retention than any product does.
What Hair Types Need Protective Styles?
Protective styles can benefit all hair types, but they are particularly important for those with curly, coily, and kinky hair types. These hair types are more prone to damage and breakage, which can impede hair growth. Protective styles can help to minimize this damage and breakage, allowing the hair to grow healthier and stronger. Looser curl patterns benefit from protective styling too, particularly through the winter and around a swimming season, though the wear windows should be shorter because finer strands carry added weight less comfortably.
Can Protective Styles Damage Your Hair?
While protective styles can be great for your hair, they can also lead to damage if not done properly. Styles that are too tight or involve too much tension on the hair cause breakage, thinning, and even hair loss. Additionally, leaving protective styles in for too long leads to matting and tangling, which can cause damage when removed. The specific risk has a name, traction alopecia, and it is covered in full further up this page. The short version is that it is reversible early and permanent late, which is why checking your hairline regularly does more good than worrying about it does.
How Long Should You Let Your Hair Breathe Between Protective Styles?
Rest for a week or two between protective styles. Your hair is not actually breathing during that time, because it stops being living tissue the moment it leaves the follicle. What recovers is the follicle itself after weeks of steady pull, along with the skin around it, and you also need the time to cleanse properly, deep condition, and trim the ends that took the worst of the take-down. Avoid over-manipulating the hair during this time, and ensure that the hair is adequately moisturized and protected.
Can Your Hair Grow Without Protective Styles?
Hair can definitely grow without protective styles. Protective styles can help promote hair growth by minimizing damage and breakage, but they are not necessary for hair growth. It's important to maintain a healthy hair care routine and to minimize exposure to heat, chemicals, and styling stress in order to promote healthy hair growth.
What Is the Healthiest Protective Style?
There isn't a ranking, and anyone who gives you one is guessing. Nobody's run a study comparing protective styles against each other for damage, so what you're left with is mechanism. The healthiest style for your hair is the one that adds the least weight, takes the largest sections, and comes out the soonest. So, the safest options are the ones that don't add braiding hair, like two-strand twists on your own hair, flat twists, or Bantu knots; and among styles with hair added, thicker sections and shorter lengths beat fine sections and long lengths every time.
Why Do They Call It a Protective Style?
Because of what's being protected, which is your ends rather than your whole head. Your ends are the oldest parts of your hair, and on textured hair they can be several years old by the time they reach your shoulders. They've been combed, washed, and handled more than anything else on your head. A protective style tucks that oldest section away so it isn't taking daily wear. That's why a style leaving your ends hanging loose does less for you than one that puts them away.
Related Articles
Protective styles are a great way to give your natural hair a break. Though these styles are "protective," you still need to prep, maintain, and remove styles promptly for the best results. Protective styles are one of the few things in natural hair care that genuinely deliver what they promise. They're also one of the few that can cost you permanently if you get them wrong.
The reassuring part is that the margin between those two outcomes is wide, and it's made almost entirely of things you control. Keep the tension low, keep the wear inside eight weeks, check your hairline against an old photo once a month, and take your style down gently when its time is up.
And if it hurts, believe it.