
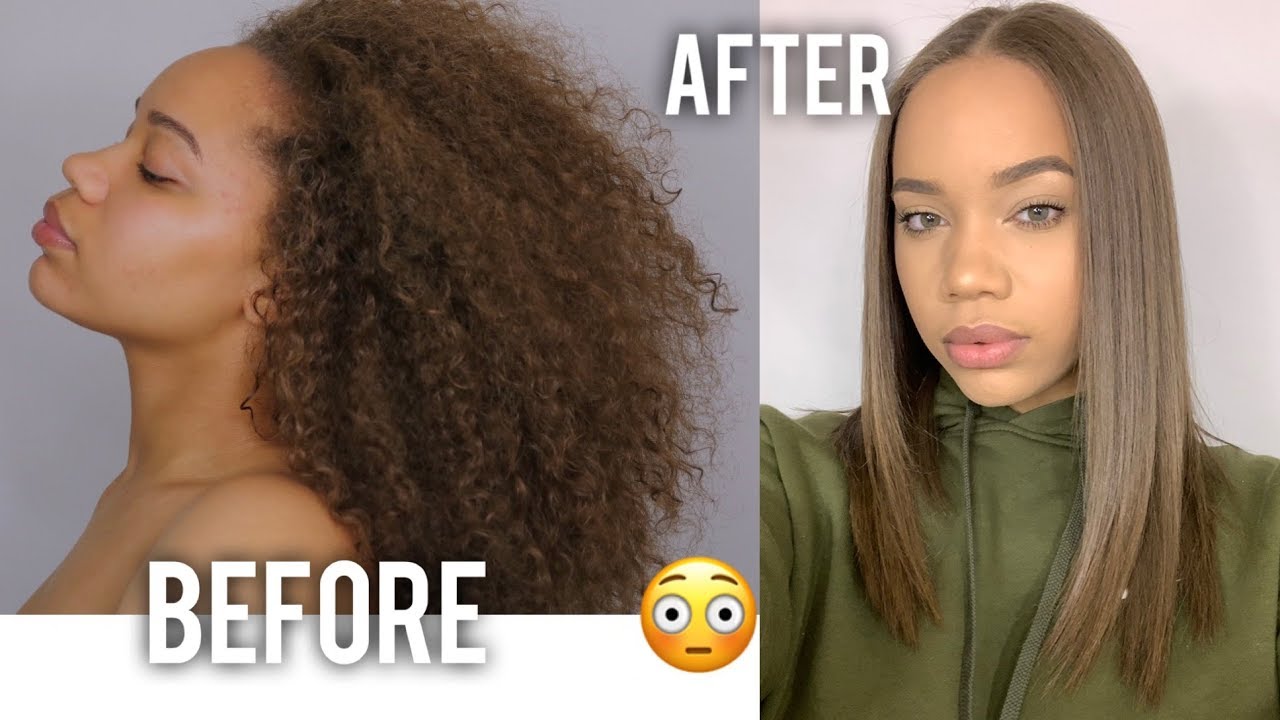
Are you ready to see the full length of your curly hair and get a break from your natural texture? Straightening your hair is one of the best ways to accomplish both goals. But before you start, read this article in its entirety.
If you don't know exactly what you're doing before, during, and after straightening, you may regret the entire experience.
In this article, we'll tell you exactly how to straighten curly hair, from the hair prep steps to the straightening process to how to preserve your straightened hair. Let's get right into it!
Table of Contents
Prepare Your Hair for Straightening
If you're considering grabbing your straightening tool and going to town, wait a minute. How well you prep your hair has a substantial effect on your straightening results and the overall health of your hair. In this section, you'll find out how to prepare your hair for straightening, whether you'll be using heat or not.

Cleanse and Condition
Straightening dirty hair is a surefire way to end up with stiff, oily, and possibly damaged tresses. For the best results, you'll need to start with a clean, moisturized canvas (the canvas being your hair). And you'll achieve that by washing and conditioning.
Here's how to do both:
- Get your hands on a high-quality sulfate-free shampoo and conditioner designed for curly hair. They have the cleansing power you need to prepare your hair for straightening but won't leave your hair dry and crunchy. Since your hair will be put through some degree of manipulation and possibly heat styling, you need to baby it prior to the fact. A couple of great shampoos and conditioners for this purpose include:
- Separate your hair into 2 to 4 sections depending on your hair texture and density. Those with fine or loose curls can get away with doing just two sections. Others with higher density or coarse curls will do better with four sections. You need a thorough cleanse, and sectioning your hair will make that easier to execute.
- Hop in the shower and turn on the water. Set the temperature to lukewarm. Never set it to hot. Doing so could cause your hair to turn out super dry and even frizzy.
- Wet your hair down thoroughly.
- Apply the shampoo of your choice to one of your hair sections, focusing mainly on the roots and your scalp. This is where dirt, oil, and debris tend to accumulate. Scrub your scalp with your fingers without using your nails.
- Repeat this on all of the rest of the hair sections.
- Pull the shampoo down to the mid-lengths and ends of your hair, and then rinse your hair in sections. Agitate your hair with your hands as you rinse to ensure that no shampoo remains.
- Apply the conditioner to your hair in sections, the same as you did with the shampoo. The only difference is that you won't apply the conditioner to the roots of your hair. You'll only apply it to the ends and maybe the mid-lengths if you find that they are dry.
- Wait for up to 30 minutes while the conditioner penetrates your hair and makes it softer, more hydrated, and easier to manage.
- While you wait, comb through your hair with a wide-tooth comb or finger detangle to remove any knots. When you get to the blow-drying and flat ironing step, you'll be glad you took the time to detangle.
- When time is up, rinse the conditioner out and hop out of the shower.

Apply a Leave-in Conditioner
While your hair is still damp from the shampooing and conditioning processes, apply a leave-in conditioner of your choice. Curly hair is so prone to dryness that it needs moisture at almost every turn, especially if you plan on straightening it with heat.
All you need to do for this step is spritz the leave-in conditioner onto your hair in sections. Be thorough, ensuring that all of your strands are covered.
You won't rinse your leave-in conditioner out - it's designed to be left in - hence its name.
If you don't have a leave-in conditioner in your hair product stash, it's time to get one. But not just any one will do. If you'll be straightening your hair the traditional way, your hair will come in contact with super high temperatures.
And you don't want your hair to be saturated in heavy products while being heat-treated. So, opt for a leave-in conditioner that's lightweight and water-based but still hydrating.
Here are a few great options to consider:
- Honest Conditioner Hair Detangler Leave-in
- OUAI Leave-in Conditioner Mist
- Carol's Daughter Black Vanilla Leave-in Conditioner Spray

Spritz on a Heat Protectant
Now that your hair is clean, conditioned, and hydrated, it's time to spritz on your heat protectant. It'll shield your hair from the heat of straightening tools and your blow dryer. If you don't plan on using any heat, you can skip the heat protectant.
To use a heat protectant, of course, you'll read the instructions on the packaging.
But most of the time, you'll be instructed to spray the leave-in conditioner on your damp hair and then comb it to distribute the product evenly. For curly hair, a wide-tooth comb is a much better tool than a narrow-tooth comb - it's much less likely to damage your hair.
One of the best heat protectants out there is CHI 44 Iron Guard Thermal Protection Spray. It will protect your hair from the high temperatures of your styling tools and make it look sleek and shiny.

Blow Dry the Hair Straight
With your heat protectant applied, the next step is to blow dry the hair straight. It's not the most difficult thing to do, but it will take some elbow grease and a few minutes.
And your hair won't get completely straight, but the straighter your hair gets during this step, the less straightening you'll have to do later with your heat styling tool later on.
For the most painless blow drying session, get your hands on a blow dryer with a comb attachment. Then, turn your blow dryer on, set it to low to medium heat, and comb through your hair with it in sections.
Always start blow drying at the ends and move upward towards the roots.
Starting at the roots with curly hair could lead to a lot of tangling and potential hair damage. Once you get one section blow-dried, move on to the next one until all of your hair is dry and stretched out.

Section Your Hair
The last hair prep step is to resection your hair. For straightening, 4 to 6 sections are ideal. Use clips or ponytail holders to keep the sections separate. Your hair is now ready to straighten.
How to Straighten Curly Hair with a Flat Iron
Straightening your curly hair with a flat iron doesn't have to be difficult. Once you get the process down, you'll realize it's relatively easy. Follow the steps below to get your hair as silky, shiny, and bouncy as possible.
- Turn on your flat iron. If you don't already have a flat iron, you should know that the material your flat iron plates are made of will have a huge effect on how they will react with your hair. If your hair is on the fine side, you need ceramic plates. These plates heat up evenly and don't get too hot. For coarser hair, you need titanium plates. They get very hot and can easily straighten type 4 strands.
- Choose a section of hair and then remove the clip or scrunchie.
- Part out a smaller subsection within that section you chose in the previous step.
- Use a narrow tooth comb to detangle the section once more. Straightening knotted or uncombed hair will leave you with unsightly bends and kinks that could ruin your look.
- Clamp the flat iron down on the roots of your hair and then pull it down past the ends. To ensure that your hair gets as straight as it could be, you can try the chase method, where you'll stick the teeth of a rat tail comb or boar bristle brush into the roots of a section of hair and then chase the tool with the flat iron.
- Part out more subsections and flat iron them. Repeat the process on all of the sections you've made until you run out of hair to straighten.

Mistakes to Avoid with Flat Ironing
With the basics down, you've got just about everything you need to flat iron your hair. Unfortunately, there are many ways that people might slip up and make a mistake that could ruin their hair or result in less-than-straight results.
Here are some mistakes to avoid with flat ironing.
- Flat ironing your hair without a heat protectant.
- Setting your flat iron temperature too low or too high for your hair type. Here are some guidelines based on hair type:
- Fine hair - 300 to 350 degrees.
- Normal hair - 350 to 400 degrees.
- Coarse hair - 400 to 450 degrees.
- Straightening sections that are too thick. The smaller the sections, the quicker the heat will make it through the hair. If your hair is really coarse or hard to straighten, make very thin sections.
- Making too many passes with the flat iron. If you use the chase method and your flat iron is hot enough, you shouldn't have to do more than one pass with the flat iron.

How to Straighten Curly Hair with a Round Brush
Chances are you've seen someone get their hair straightened with a round brush before. And it was probably in a salon - it's actually called a salon blowout.
This hair straightening method requires you to blow dry and brush through your hair with a specialized brush to both straighten the hair and give it more volume.
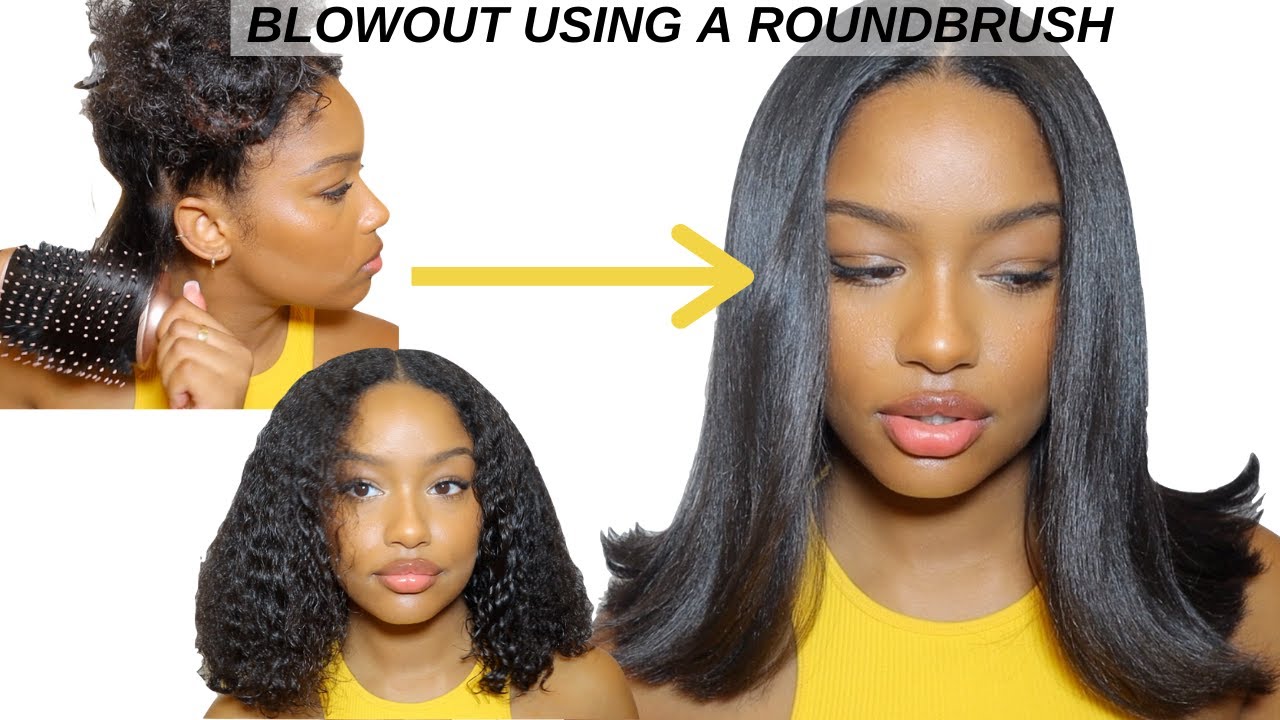
Follow the below steps to straighten your curls with a round brush.
- Take all of the hair preparation steps we mentioned earlier in this article. Except you'll only blow dry your hair to about 60% dryness.
- Get your hands on a round brush. It's way different from brushes you may have used before. The bristles wrap around the entire brush, and the barrel is made of a material with heat conductivity, like ceramic. Choose a round brush that doesn't have beads at the end. You'll also need a blow dryer with a concentrator nozzle.
- Turn the blow dryer on and set it to medium heat.
- Part out a section of hair that's anywhere from .5 to 1 section in thickness.
- Place the round brush under the section and hold the blow dryer over the section, about an inch above it.
- Slowly move the round brush from the base of your roots down to the ends, following the brush with the blow dryer. It's best to direct the brush away from your face.
- Bring the round brush back to the base of your roots and then slowly down to your ends again. Still following the brush with the blow dryer. But this time, flick your wrist to make the brush go at a different angle. Doing this will ensure that the hairs on the inside of the section will get dry and straight.
- Continue with the previous step until you see that your hair is almost dry.
- To finish off the section and add a little curl at the end, flick your wrist and twist the brush when you get to the ends of the hair. Keep the blow dryer nozzle on the opposite side of the brush (about an inch away) to ensure even heat distribution.
- Repeat this process on all of your hair.

Mistakes to Avoid When Using a Round Brush
If you want a sleek, bouncy blowout, you'll follow the steps above as written. But you'll also want to avoid these common mistakes:
- Using your round brush on drenched hair. Though you might see professionals round brush hair from soaking wet, it's extremely difficult to do so at home, especially on curly hair.
- Blowing out hair that's coated in a ton of product. Doing so will result in sticky, stringy results that no one wants.
- Never cleaning your round brush. Your round brush might not look visibly dirty after using it several times, but it still needs to be cleaned periodically. If you blow your hair out with a dirty tool, you could transfer product to your strands and ruin your results.
Note: There are blow dryer brushes out there that function as both the blow dryer and a round brush. That way, you won't have to keep track of the blow dryer and the brush simultaneously during styling.

How to Straighten Curly Hair with a Straightening Brush
For those who want a hair straightening method that doesn't require you to use two tools simultaneously, look into the straightening brush method. It involves using a specialized heated brush that straightens your hair just by brushing it out.
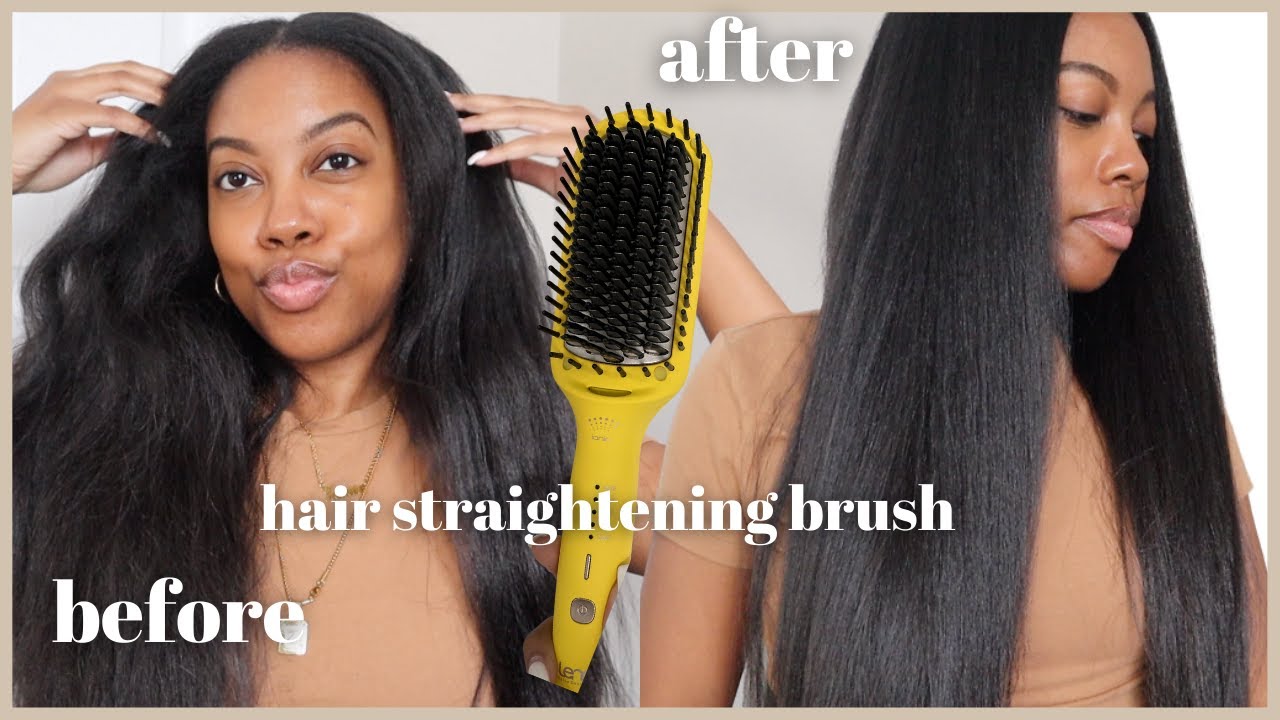
- To straighten your hair with a straightening brush, you'll:
- Follow the preparatory steps mentioned earlier in this article.
- Part out small to medium subsections of hair.
- Choose a section and brush it from roots to ends, going relatively slowly. Hold the ends of your hair section to create a little tension as you brush through it. Watch your fingers!
- Move on to the next section, and then repeat the process until you run out of hair.
Though this method is easy, it doesn't create the sleekest results. If that's not a problem for you, feel free to try it!

Tips to Keep in Mind When Wearing Your Hair Straight
Going from straight to curly can be super fun and make you feel brand new. But if you want to keep your straight tresses around, there's a little work required on your part. Here are a few tips to remember when wearing your hair straight.
Wrap and Protect Your Hair at Night
Sleeping on your straight hair without protection is a no-no if you don't want it to revert. To encourage the strands to remain straight, use a brush to wrap them around your head in sections (this is officially called "wrapping your hair").
Then, put a silk or satin scarf on your head and secure it with a knot. When you wake up, you'll brush or comb your hair down, and it'll have all the body and bounce in the world.
Keep Your Ends Neat and Trimmed
Straightening your hair often reveals a lot of split ends and maybe some breakage. Failing to cut this hair off will cost you sleekness and movement. So, either trim your ends or visit a hairstylist for a trim.
Try to Avoid Getting Your Hair Wet
Getting your hair wet is the worst thing you can do after straightening your naturally curly hair. It will cause your hair to revert to its curly state. To prevent this, avoid heavy workouts, hanging out in hot places, letting your hair get wet in the shower, etc. You may even need to wrap your hair up when going out on a humid day.
- Does Straightening Hair Ruin Curls?
- Straightening Natural Hair
- Why Doesn't My Hair Stay Straight When I Straighten It
So, there you have it - everything you need to know about straightening curly hair. We hope you found the information you were looking for, and we wish you the best in your hair styling endeavors!


