Curl Centric: Curly Hair Products, Hairstyles, and Hair Growth Techniques

  • Hair Care
  • Hair Growth
  • Hairstyles
  • Products
    • Shampoos
    • Conditioners
  • About
    • About Us
    • About Kenneth Byrd
    • About Kira Byrd
    • FAQs
    • Contact
    • Editorial Guidelines
menu icon
go to homepage
  • Hair Care
  • Hair Growth
  • Hairstyles
  • Products
    • Shampoos
    • Conditioners
  • About
    • About Us
    • About Kenneth Byrd
    • About Kira Byrd
    • FAQs
    • Contact
    • Editorial Guidelines
search icon
Homepage link
  • Hair Care
  • Hair Growth
  • Hairstyles
  • Products
    • Shampoos
    • Conditioners
  • About
    • About Us
    • About Kenneth Byrd
    • About Kira Byrd
    • FAQs
    • Contact
    • Editorial Guidelines
×

How to Part Your Hair: Part Down the Middle, to the Side & More

Published: May 10, 2023 by Kenneth Byrd · This post may contain affiliate links

A beautiful black girl with thick hair that's wearing her hair straight with a natural part that is slightly off center on the left side of her head naturally falls around her cut face.

How you part your hair has a significant impact on how your hairstyles come out. If you want to achieve looks that require clean parts and your parting skills are subpar, you’re at a real disadvantage.

Whether you’ve never really cared about your parts before or you’ve been trying to refine your skills for a while, this article is for you. In it, we’ll give you the rundown on how to part your hair the right way. Let’s get right into it! 

Table of Contents

  • 1 How to Part Your Hair Yourself
  • 2 How to Do a Basic Part
  • 3 The Most Common Part Types 
    • 3.1 Middle Part 
    • 3.2 Side Part
  • 4 Deep Side Part 
  • 5 Not Every Part Type Works for Everyone
  • 6 Does Hair Texture Play a Role in the Type of Part You Should Choose? 
    • 6.1 Related Articles

How to Part Your Hair Yourself

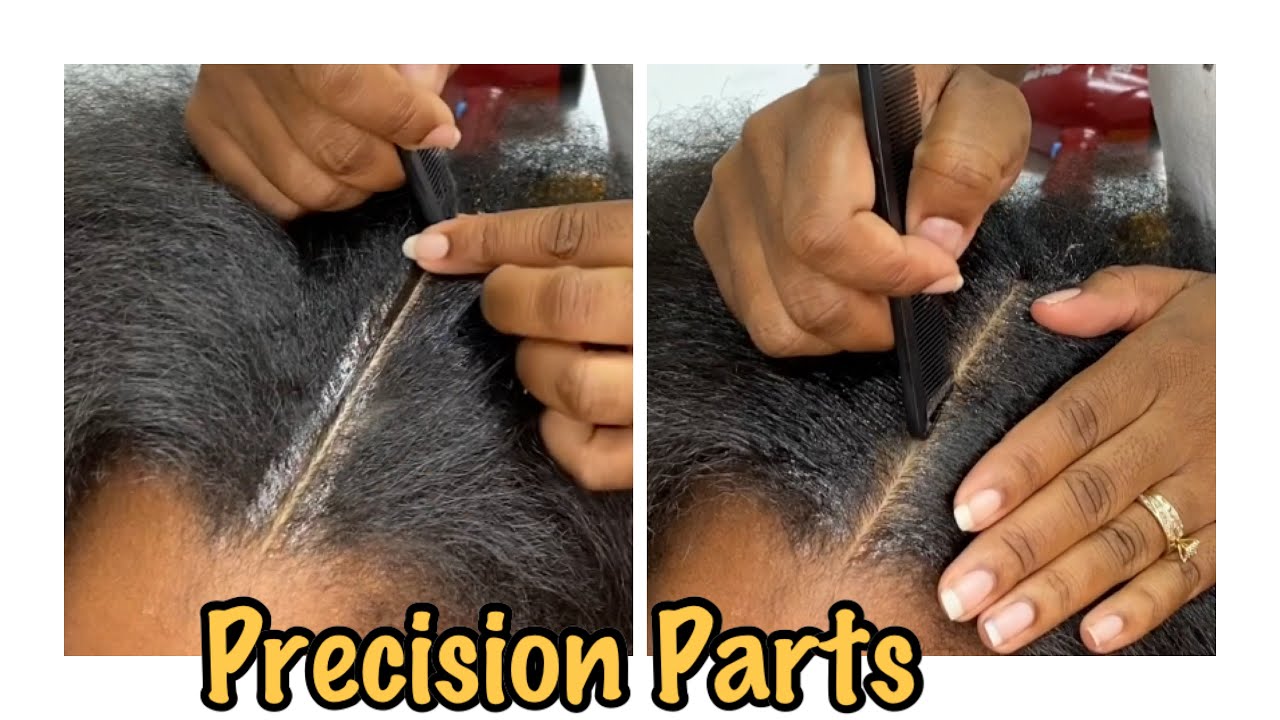
Before you part your hair, get your hands on the right supplies. First and foremost, you’ll need a rat-tail comb. The great thing about a rat tail comb is that it has a straight edge you can use to create literally any part that you want.

Zig-zags, curves, and the straightest of the straight - a rat tail comb can handle it all.

If you’re a stickler for clean parts, you’ll want to get yourself some edge control as well. The edge control can be added to the roots of the hair prior to parting. And when you go to part the hair, you’ll notice that the parts are super clean without a hair out of place (more on this later). 

She expertly rocks a straight, natural part that falls off-center, perfectly framing her gorgeous features.

How to Do a Basic Part

Now, let's get to the instructional portion of the article. We'll start with the "basic part" - a part you'll do with a regular comb and no extras. All you’ll do is decide on the part that you want, place the tip of your comb where you want the part to start, and then drag it along your scalp as desired.

#124. Learn to Braid: HOW TO - Precision Parts

If you want a straight part, you’ll drag the comb straight back, straight across (horizontally), or even diagonally. For a curved part, you’ll curve the comb as desired.

The Most Common Part Types 

There are a few part types that people all over use to create hundreds, if not thousands, of hairstyles. These include the middle part, the side part, and the deep side part. Keep reading for an explanation of how to achieve each of these common parts. 

Using insider hair tips, she manages to create a stunning look that complements her face shape.

Middle Part 

The middle part might seem to be the easiest part you’ll ever do, but you’d be surprised at how many people struggle to get this one right. Here’s how to do it the right way every time. 

  1. Take a wide-tooth comb and comb your hair backward. 
  2. Line your rat tail comb up with the middle of your nose. The straight end of the rat tail comb should be right at the start of your hairline. Doing this will ensure that your part starts at the right point (smack dab in the middle). 
  3. Push the comb straight backward, doing the best you can, not to change directions. Stop pushing the comb back when you get to the highest point of your head unless your style calls for you to continue the part to the back of your head. 
  4. Lift up the rat tail comb, and then use your pointer fingers to pull the hair away from the middle part. Use your rattail comb to further separate each side of your hair, making the part even more visible and clean. 
Her thick, luscious locks are the envy of everyone, and she effortlessly adds length with hair extensions.

Side Part

We all love the mysterious vibe of a side part. It adds an element of glam to a variety of styles, from straight and curly to braided and ultra-formal.

So, if you want hairstyling freedom, you should know how to do a side part like the back of your hand. Here’s how to execute a side part:

  1. Comb the front of your hair backward to reveal your hairline. Don’t use a rat tail comb for this part - it can pull out your hair or otherwise damage it. A wide-tooth comb is the better option. 
  2. Decide how far out to the side you want your side part. Any part that’s positioned off-center is considered a side part. Once you’ve chosen where you want your side part to be, get your rat tail comb and go to the next step. 
  3. Place the tip of your rattail comb where you want your side part to begin. Lie it flat against the front of your hairline.
  4. Begin parting your hair by dragging the end of the rattail comb from the front of your hairline to where the crown of your head begins. 
  5. Lift the comb ever so slightly and use your pointer finger from the opposite hand to trace the part you made. Then remove the comb and separate both halves of your hair with your hands. You can then comb the hair on each side down to further define the part. 
With just her hand and a wide-toothed comb, she creates a flawless part that accentuates her natural beauty.

Deep Side Part 

For the deep side part, you’ll follow the same process as you would for a side part. The only difference is that the part should line up with the outer corner of your eye. So, use your rat tail comb and your eye to start your part at the right spot. 

Not Every Part Type Works for Everyone

You may not have known this, but not every part type will complement every face shape. Some parts can make long faces look abnormally long or widen round faces. If you’re interested in learning the best part type for your face shape, the below list will help you out.

By tilting her head forward, she is able to achieve the perfect off-center part that's all the rage.
  • Heart Shape - For those with heart-shaped faces, a middle part will be ideal. When your hair is parted in this manner, your face will look slimmer and more elongated. Side and deep side parts can give the illusion of a wider face when paired with a heart-shaped face. 
  • Round Shape - If you have a round face shape, we recommend going with a middle part or a side part. A middle part lends an angular quality to the average round face, which can make you look more attractive. The same goes for side parts. 
  • Long Faces - Depending on just how long your face is, you may be able to get away with a middle part. If it’s very long, though, go for a side part. Some say that any part type will mesh well with long faces. 
  • Square faces - Square faces pair well with both side parts and middle parts.
  • Diamond shape- To accentuate a diamond-shaped face, try a side part. A side part will highlight your high cheekbones. You can even rock a deep side part if you’re daring. Middle parts could also work, but depending on the style you’re wearing, they can hide your cheekbones. 

Remember that these recommendations are generalized. You should choose a part that makes you feel confident above all else. After all, you’re the one that has to wear the style you choose - no one else. 

A classic center part might seem like a safe option, but this stylish young woman goes for the bold, off-center approach.

Does Hair Texture Play a Role in the Type of Part You Should Choose? 

Some sources suggest that your hair texture determines which part you should choose. That’s just not the case. Straight hair, curly hair, wavy hair, and even multi-textured tresses can all look great parted any way. 

But there are a few tips you should keep in mind when parting different hair types

  • If you’re doing a middle part on curly hair, you may have to use extra smoothing products to ensure that the hair on the sides of the part don't hide your part.
  • If you normally wear your part on a certain side and your hair is straight, you could experience some flatness at the roots. If that happens, consider wearing your part on the opposite side. You’ll get much more volume that way. 
  • If your hair is super textured and you want your parts to be incredibly clean, apply some edge control to your roots before parting. Your part will be much cleaner than if you parted your hair with a comb alone. 

Related Articles

  • Why Has My Hair Started Parting in the Back
  • Protective Hairstyles for Hair Growth
  • Cut My Own Hair

So, there you have it - everything you need to know about parting hair. We hope you found this article to be helpful, and we wish you the best as you learn how best to style your hair. 

More Going Natural

  • A cute white girl with gummy bleached hair is experiencing hair breakage and split ends from over-processing.
    How to Fix Gummy Hair After Bleaching, Perm, or Washing
  • A cute black girl with natural curls on a type 3 hair texture styled with natural oils in a loose ponytail hairstyle that's perfect for her greasy hair.
    How to Take Care of Curly Hair: Hair Care Regimens for Curls
  • A pretty black female with natural curly hair styled with natural oils creates a soaking wet hair appearance on her dark brown thick hair.
    How to Wash Curly Hair: DIY Shampoo or Co-Wash Curly Hair
  • Why Use Microfiber Towels for Hair
    Best Microfiber Hair Towels and Turbans for Drying Curly Hair
  • Facebook
  • X
  • Reddit

About Kenneth Byrd

Kenneth Byrd, with a BS in Accounting and Management Information Systems and an MBA from the University of Alabama at Birmingham, has over 15 years of experience and is a recognized authority in hair care. Co-founder of Curl Centric® and Natural Hair Box, Kenneth has dedicated himself to promoting ethical and scientifically-backed hair care practices. Rigorous editorial guidelines, industry recognitions, and features in numerous media outlets evidence his expertise. Kenneth’s commitment to transparency, quality, and empowerment has positioned him as a trusted voice in the field, empowering readers to confidently embrace their natural beauty.

Kira Byrd wearing short pixie cut

Hey, I'm Kira!

Curl Centric is a curly hair blog created by husband-and-wife team Kenneth and Kira Byrd. With over 15 years of experience and a community of 10,000+ daily readers, we share trusted techniques to help you embrace and care for your natural curls with confidence.

More about us

Popular Posts

  • Black man with mature dreadlocks
    How To Get Dreadlocks: Origin, History, Hairstyles and More
  • black women wearing goddess braids locs and green shirt
    Goddess Braids: How to Create and Maintain DIY Goddess Box Braids Hairstyles
  • crochet box braids
    How to Create Cute Box Braids Hairstyles, Designs, and Ideas
  • Cute African American female with a light-brown skin tone and a TWA hair length that requires minimal styling.
    TWA Hairstyles: Short and Medium TWA Styles and Haircuts

Recent Posts

  • A beautiful African American female with gorgeous curls on her 4A natural hair styled with organic styling products.
    Can You Put Mousse on Synthetic Hair? Synthetic Wigs, Weaves & Braids?
  • A cute black female wearing a 4x4 lace closure wig with curly hair strands and a natural and beautiful hairline.
    What Is a 4x4 Lace Wig? What Does a 4x4 Lace Wig Look Like
  • A cute white lady wearing a red shirt with curly permed hair curled with perm rods.
    When Can I Wash My Hair After a Perm? Bust Permed Hair Myths
  • A beautiful young African American female with a 4C fine hair texture styled with jojoba oil and an edge brush.
    Best Edge Control, Tamers, and Styling Gel for Natural Hair
  • A white girl with towel-dried hair after using T15 pale beige blonde permanent liquid hair toner on her light brown curls.
    Wella T15 Before and After on Orange, Beige, and Yellow Hair
  • A black female with frizzy curls and wavy hair styled with flaxseed hair gel and coconut oil.
    How to Use Flaxseed Gel for Curly Hair: DIY Hair Gel for Curls

Footer

↑ back to top

About

  • Meet the Team
  • Privacy Policy
  • Terms
  • Blog

Contact

  • Contact
  • FAQs
  • Sitemap

CurlCentric.com is an independent, advertising-supported publisher. Curl Centric® services, articles, content, and products are provided for informational purposes only. Curl Centric does not provide professional medical advice, diagnosis, or treatment. Curl Centric follows a strict editorial policy that produces accurate, factual, and honest content to help you make the right hair care decisions. Curl Centric has an affiliate relationship for some of the products that we recommend. We may receive compensation if purchases are made using our links, at no extra cost to you. CurlCentric.com is a participant in the Amazon Associates Program. As an Amazon Associate, we earn from qualifying purchases. To ensure that we maintain our editorial integrity, our editorial team does not receive direct compensation from our sponsors and advertisers. The product recommendations and advertisers that appear on Curl Centric are from companies that compensate us through an exclusive, full-service ad management partner. This compensation does not influence the content we publish or the product reviews shown on our site.

COPYRIGHT © 2023 CURL CENTRIC® ALL RIGHTS RESERVED.
Curl Centric®, a trademark of Natural Hair Community, LLC

1401 Doug Baker Blvd Ste 107 604 Birmingham, AL 35242 | 1 (844) 424-CURL